Proton Calorimetry/Experimental Runs/2017/September7: Difference between revisions
No edit summary |
No edit summary |
||
| (4 intermediate revisions by the same user not shown) | |||
| Line 1: | Line 1: | ||
Beam tests of the Nuvia 10 mm, 4 mm and 3 mm scintillator sheets with PRaVDA CMOS pixel sensors (PRIAPUS) at the Birmingham Cyclotron with a 28 MeV beam. | Beam tests of the Nuvia 10 mm, 4 mm and 3 mm scintillator sheets with PRaVDA CMOS pixel sensors (PRIAPUS) at the Birmingham Cyclotron with a 28 MeV beam. | ||
__TOC__ | |||
== Pre-data Taking Information and Notes == | == Pre-data Taking Information and Notes == | ||
| Line 8: | Line 10: | ||
*From previous measurements, the average background value per pixel is ~ 700. | *From previous measurements, the average background value per pixel is ~ 700. | ||
*The data was recorded at '''45 frames/second'''. | *The data was recorded at '''45 frames/second'''. | ||
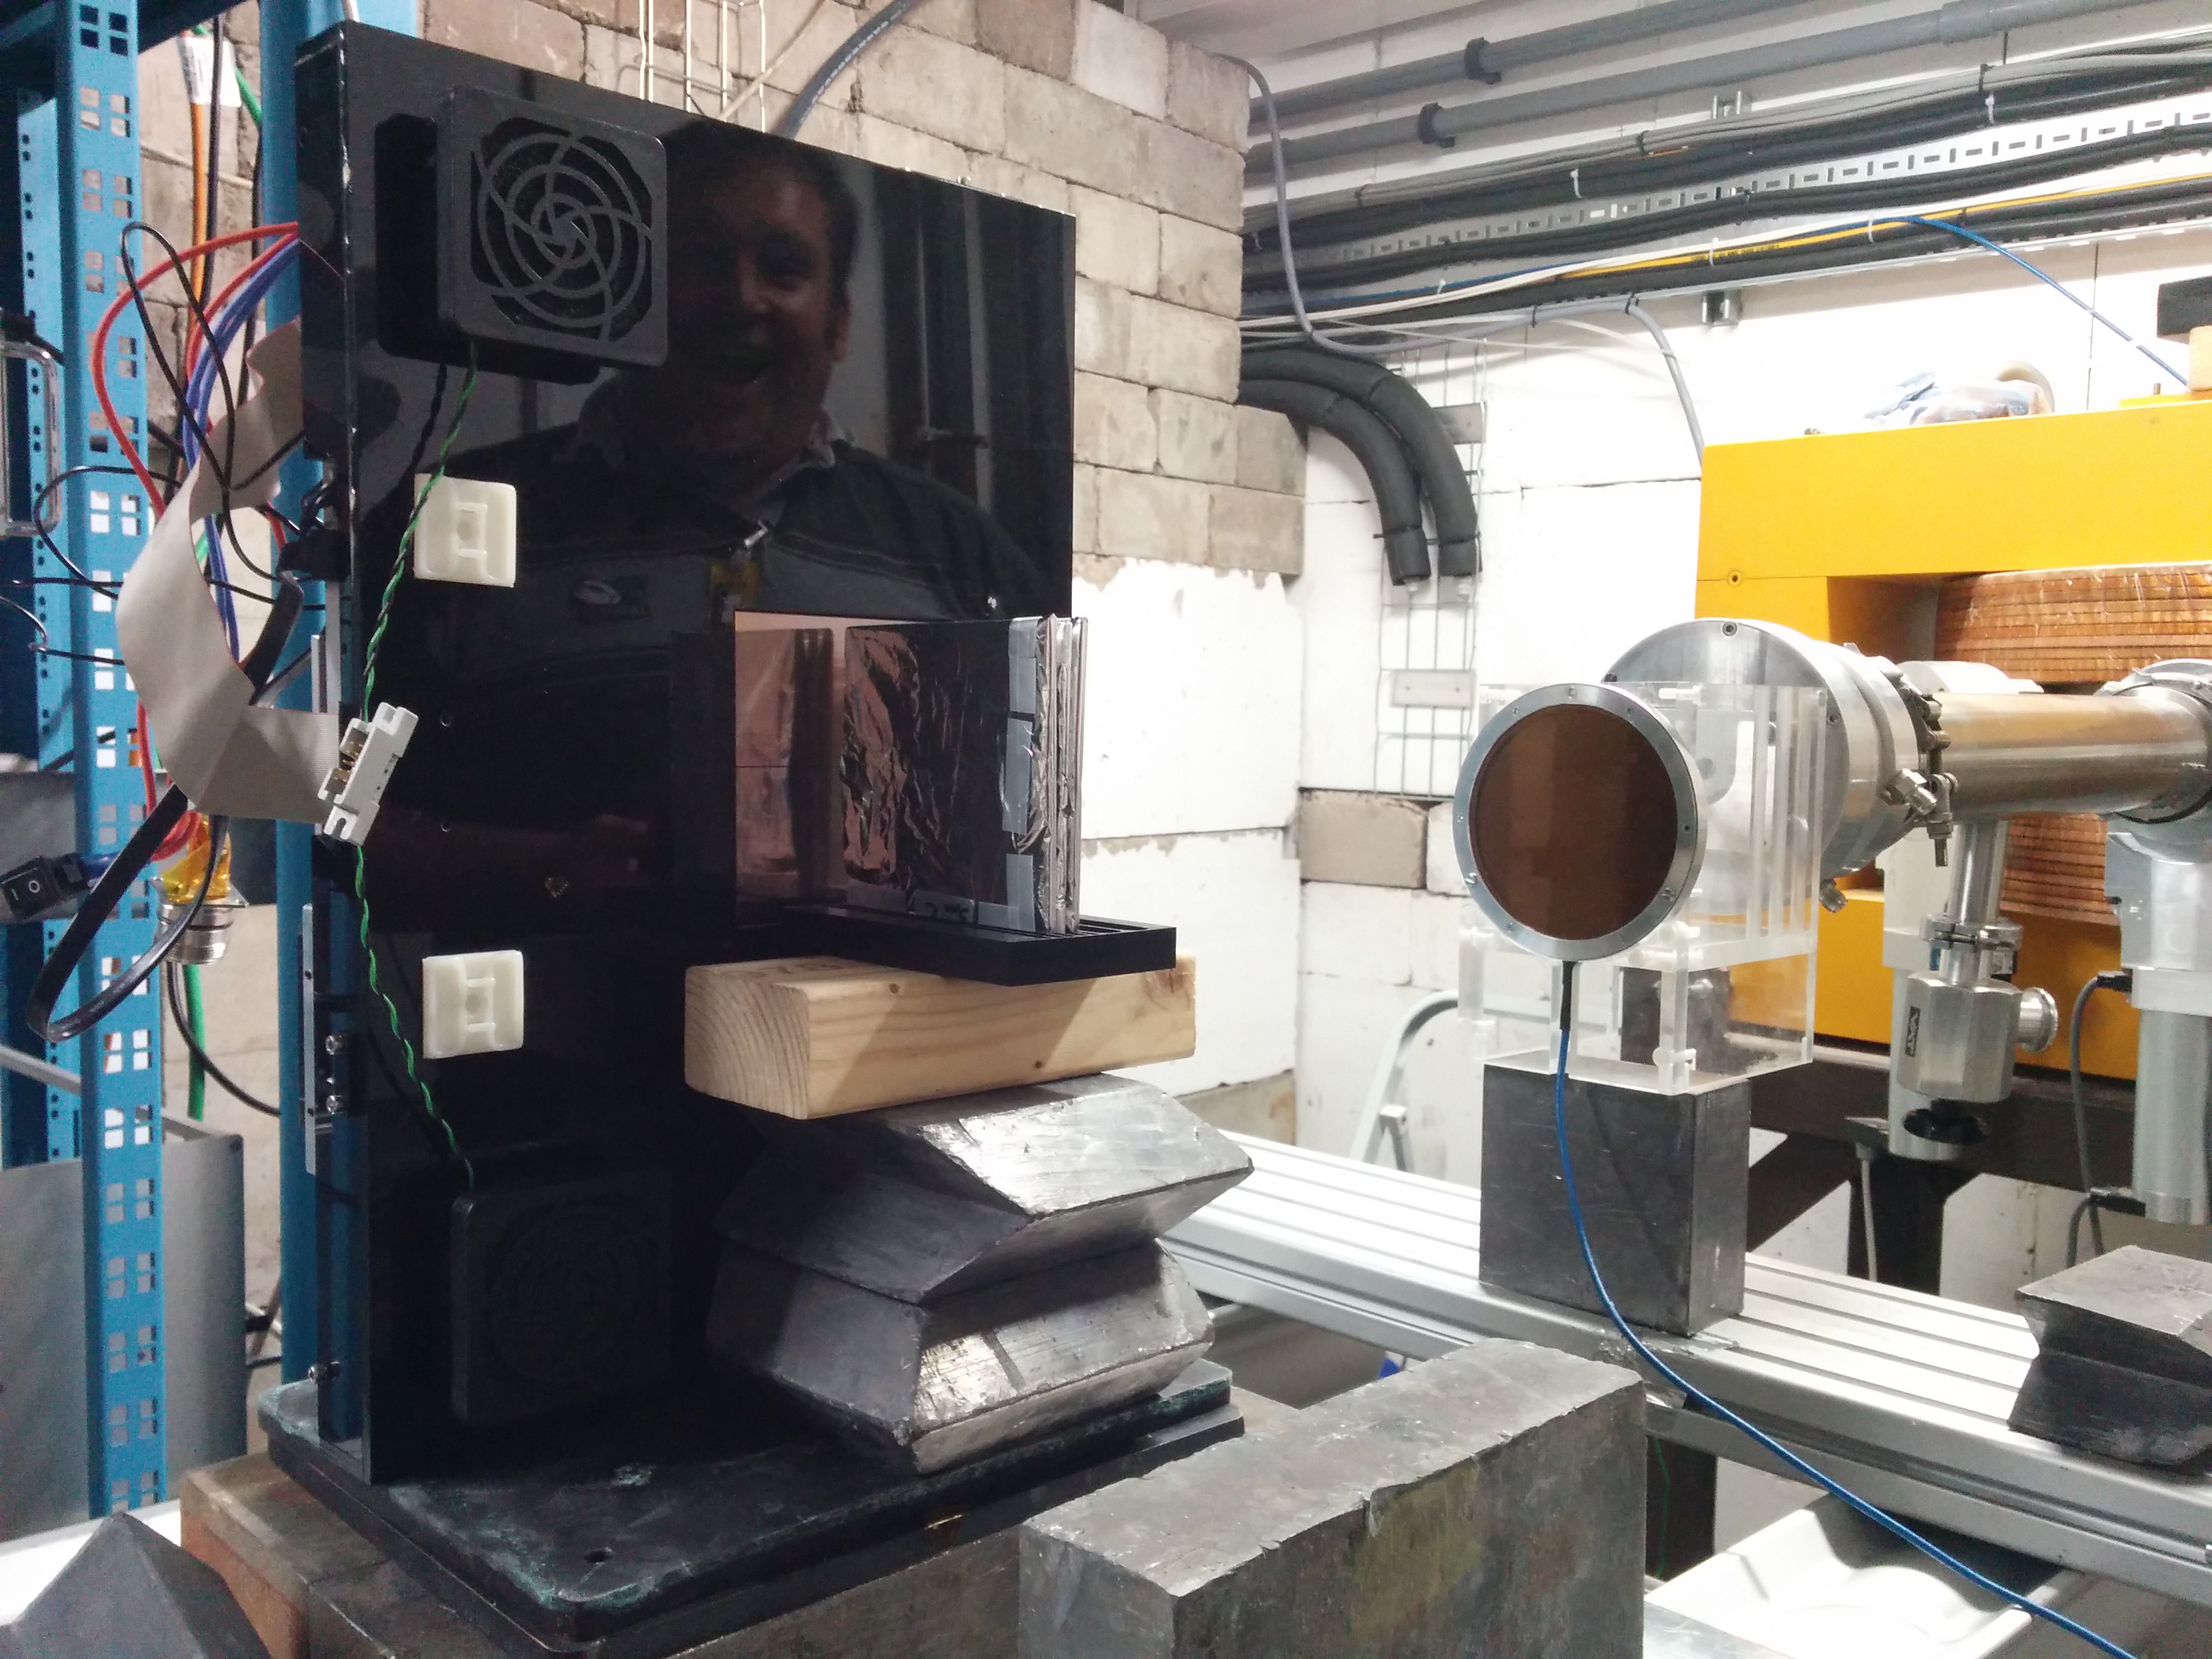
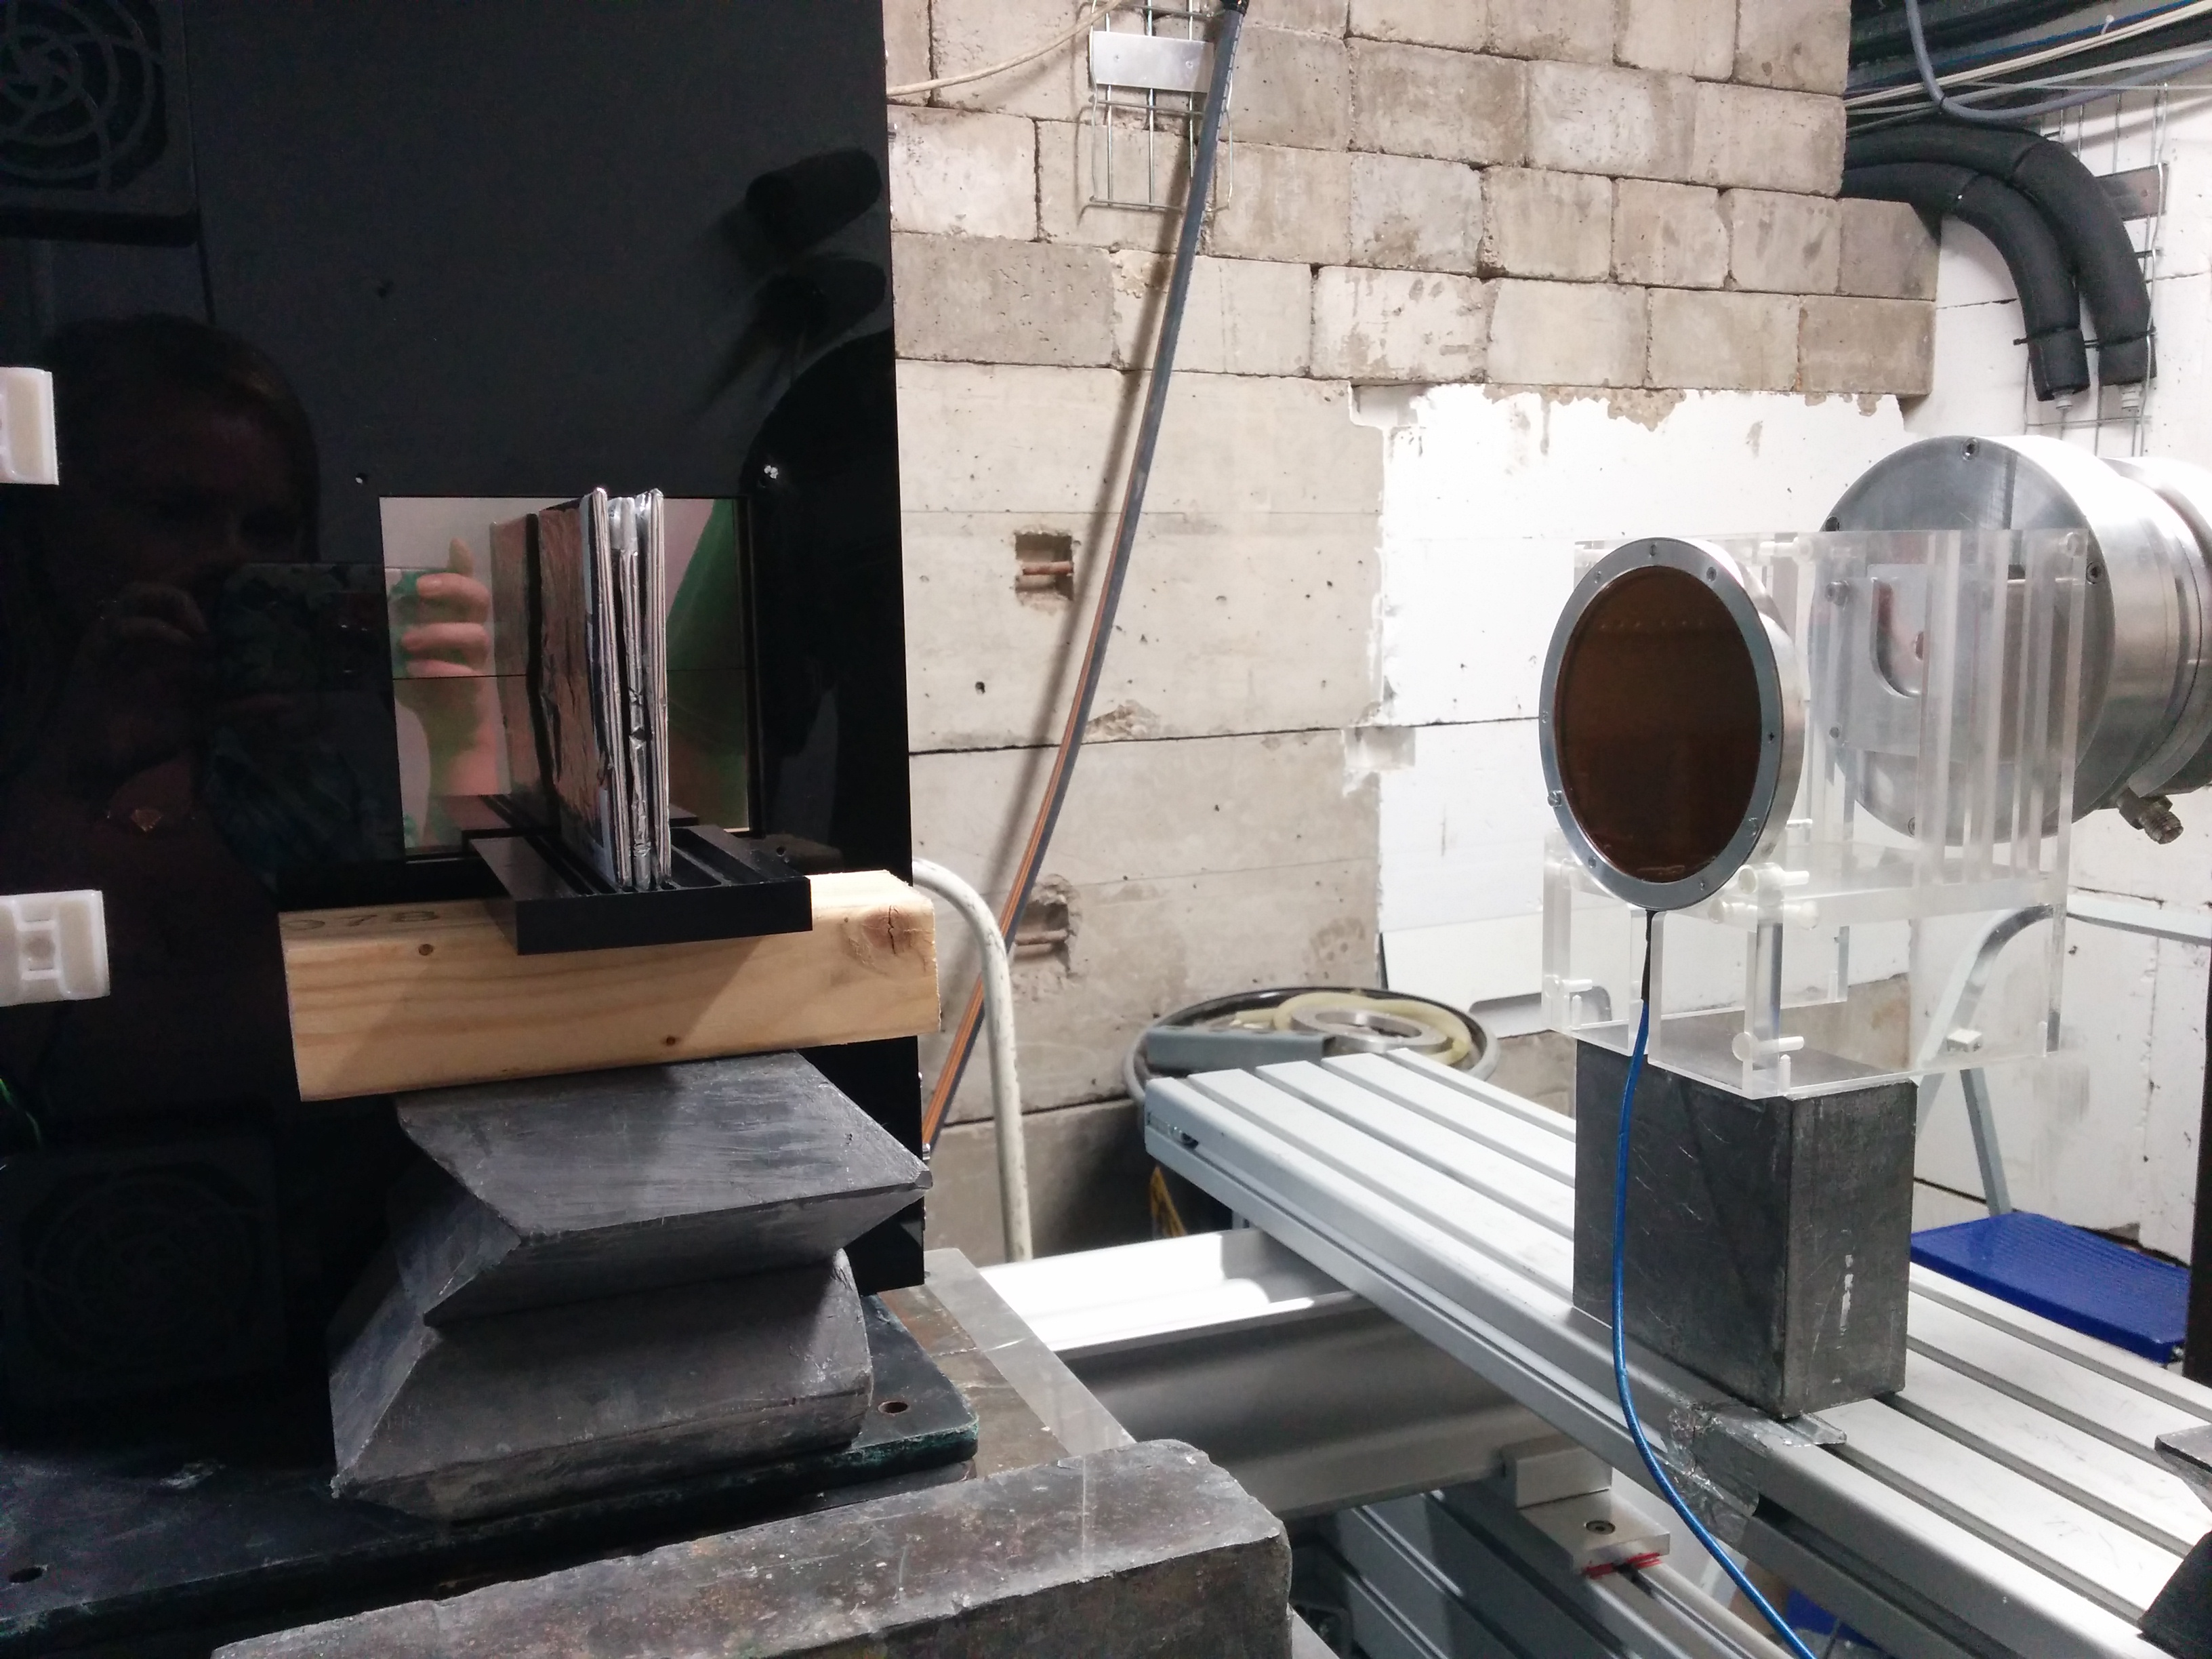
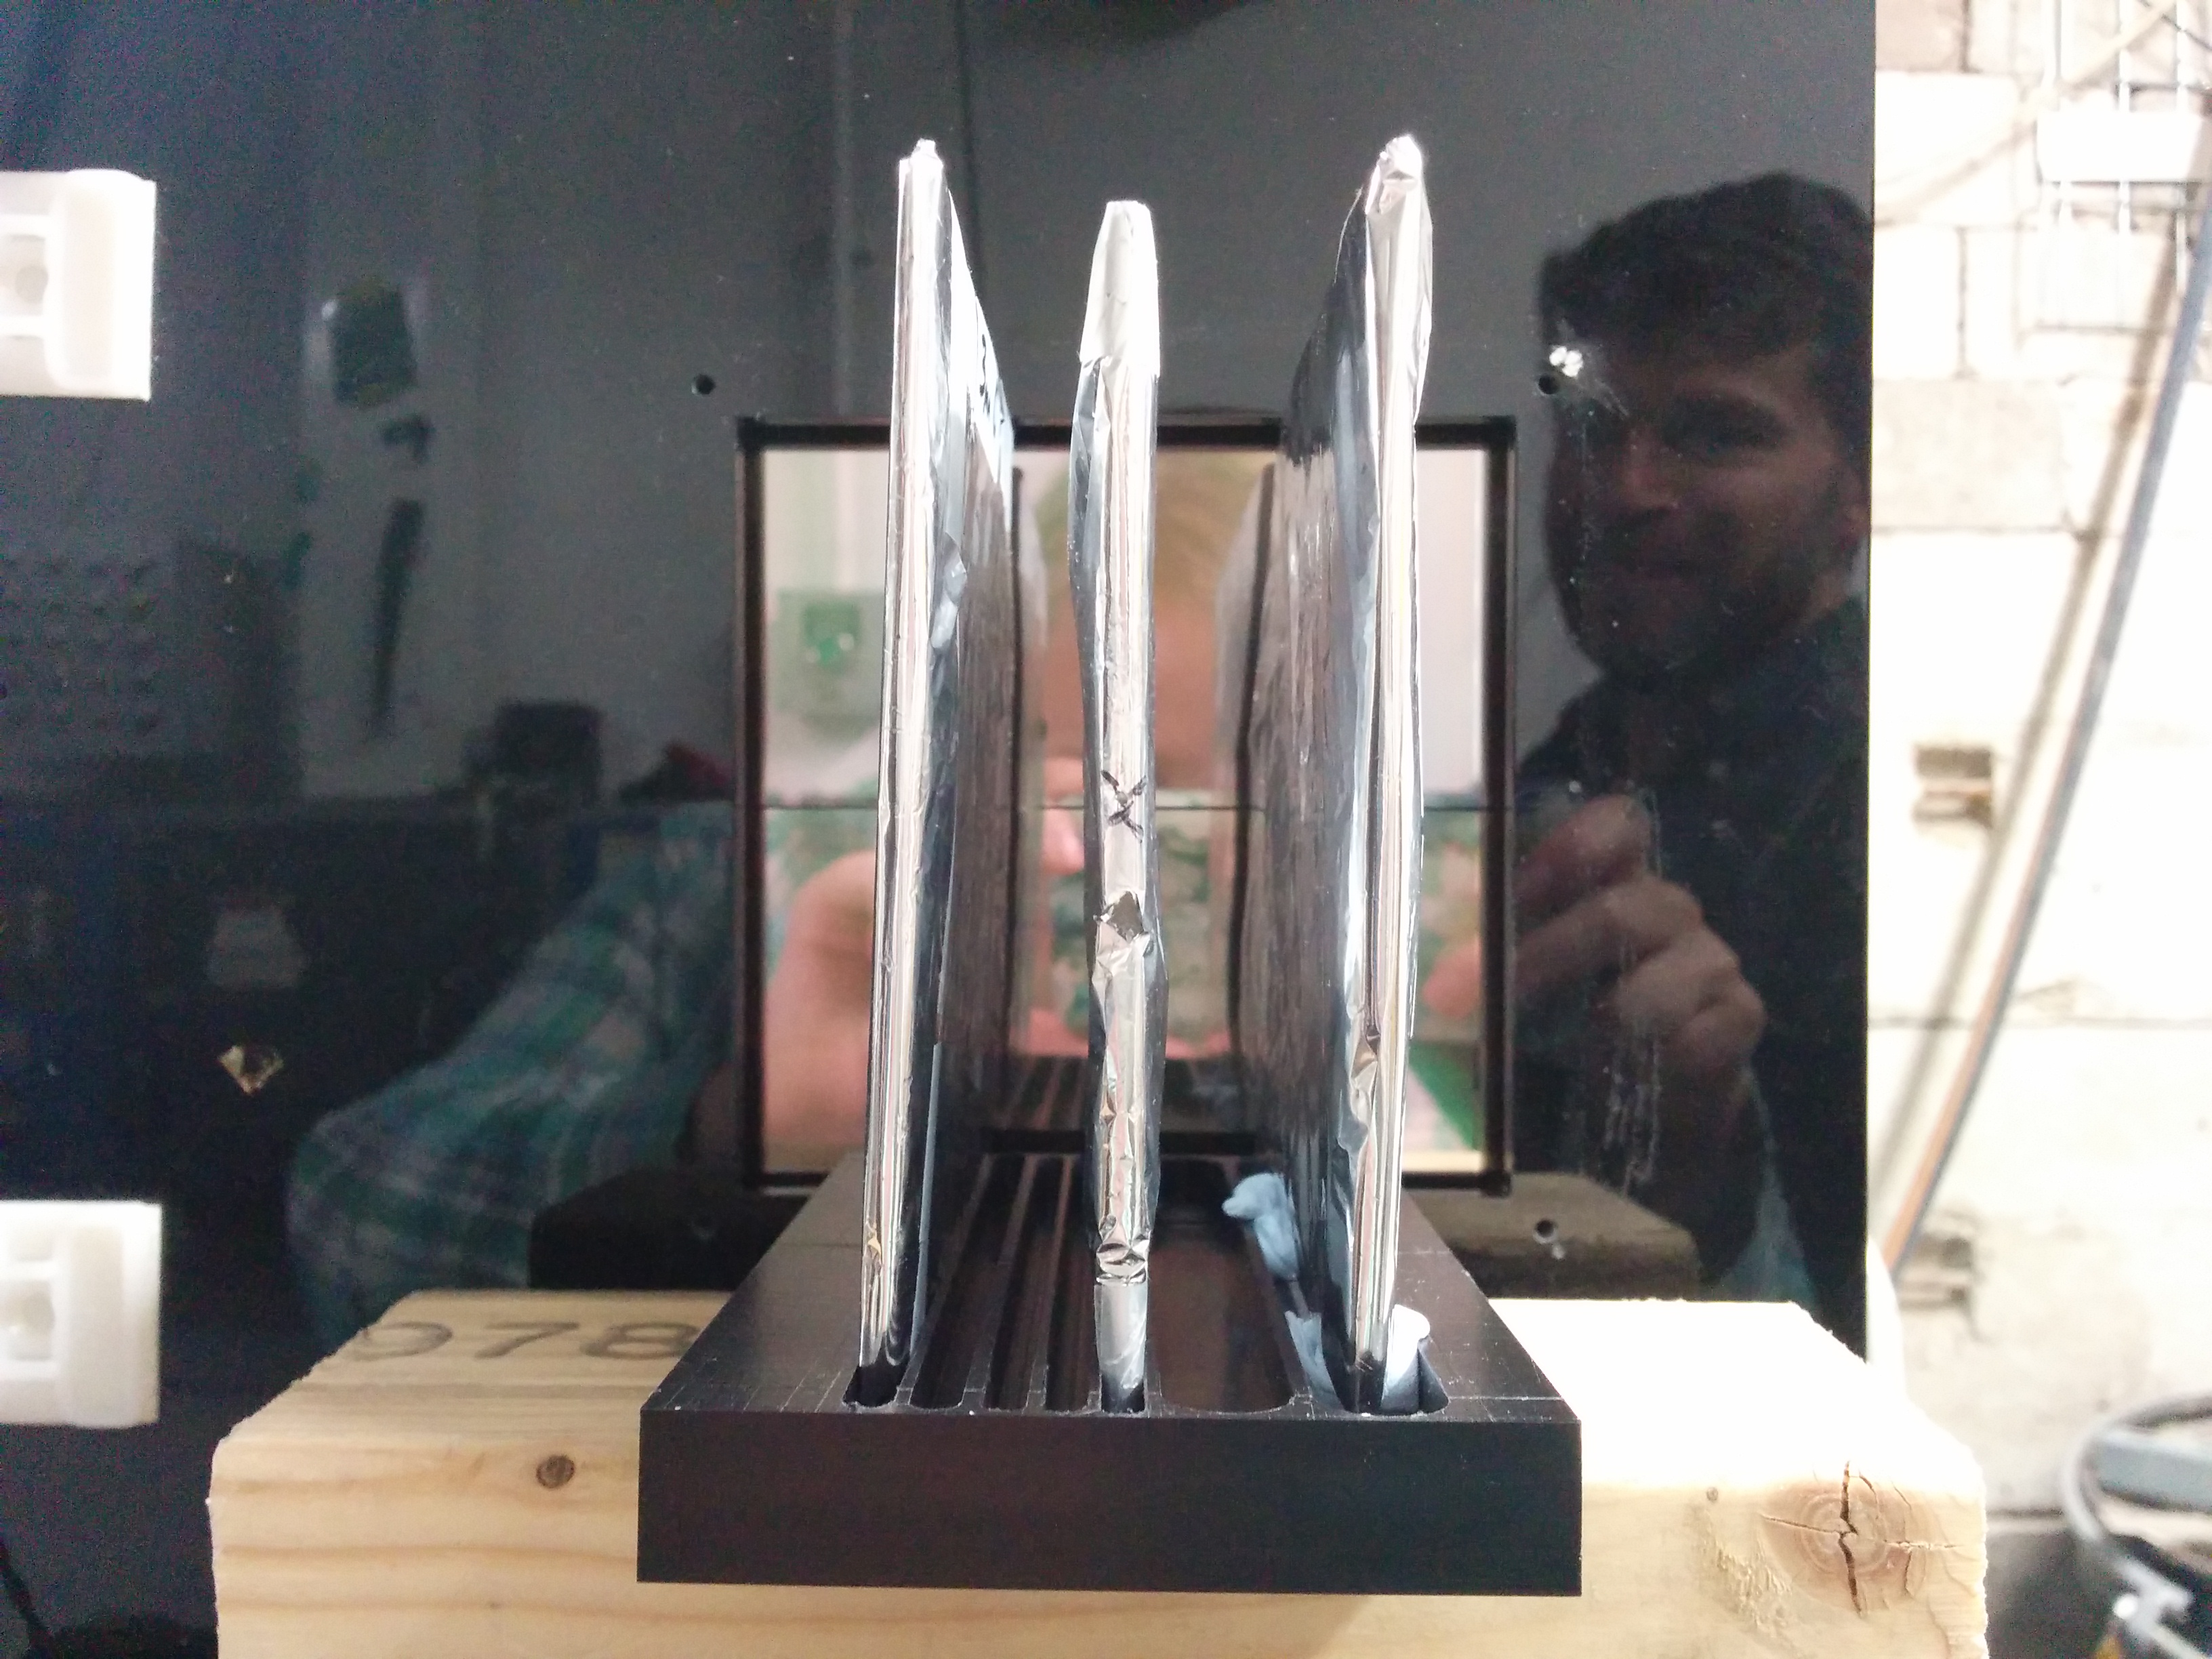
*The scintillator stack was set up perpendicular to the proton beam, with the exposed sides of the scintillator facing the sensors: | |||
<div class="image400px" style="text-align: center;"> | |||
[http://www.hep.ucl.ac.uk/pbt/wikiData/images/Birmingham_sept2017/setup_1.jpg http://www.hep.ucl.ac.uk/pbt/wikiData/images/Birmingham_sept2017/setup_1.jpg] | |||
[http://www.hep.ucl.ac.uk/pbt/wikiData/images/Birmingham_sept2017/setup_2.jpg http://www.hep.ucl.ac.uk/pbt/wikiData/images/Birmingham_sept2017/setup_2.jpg] | |||
<br /> | |||
</div> | |||
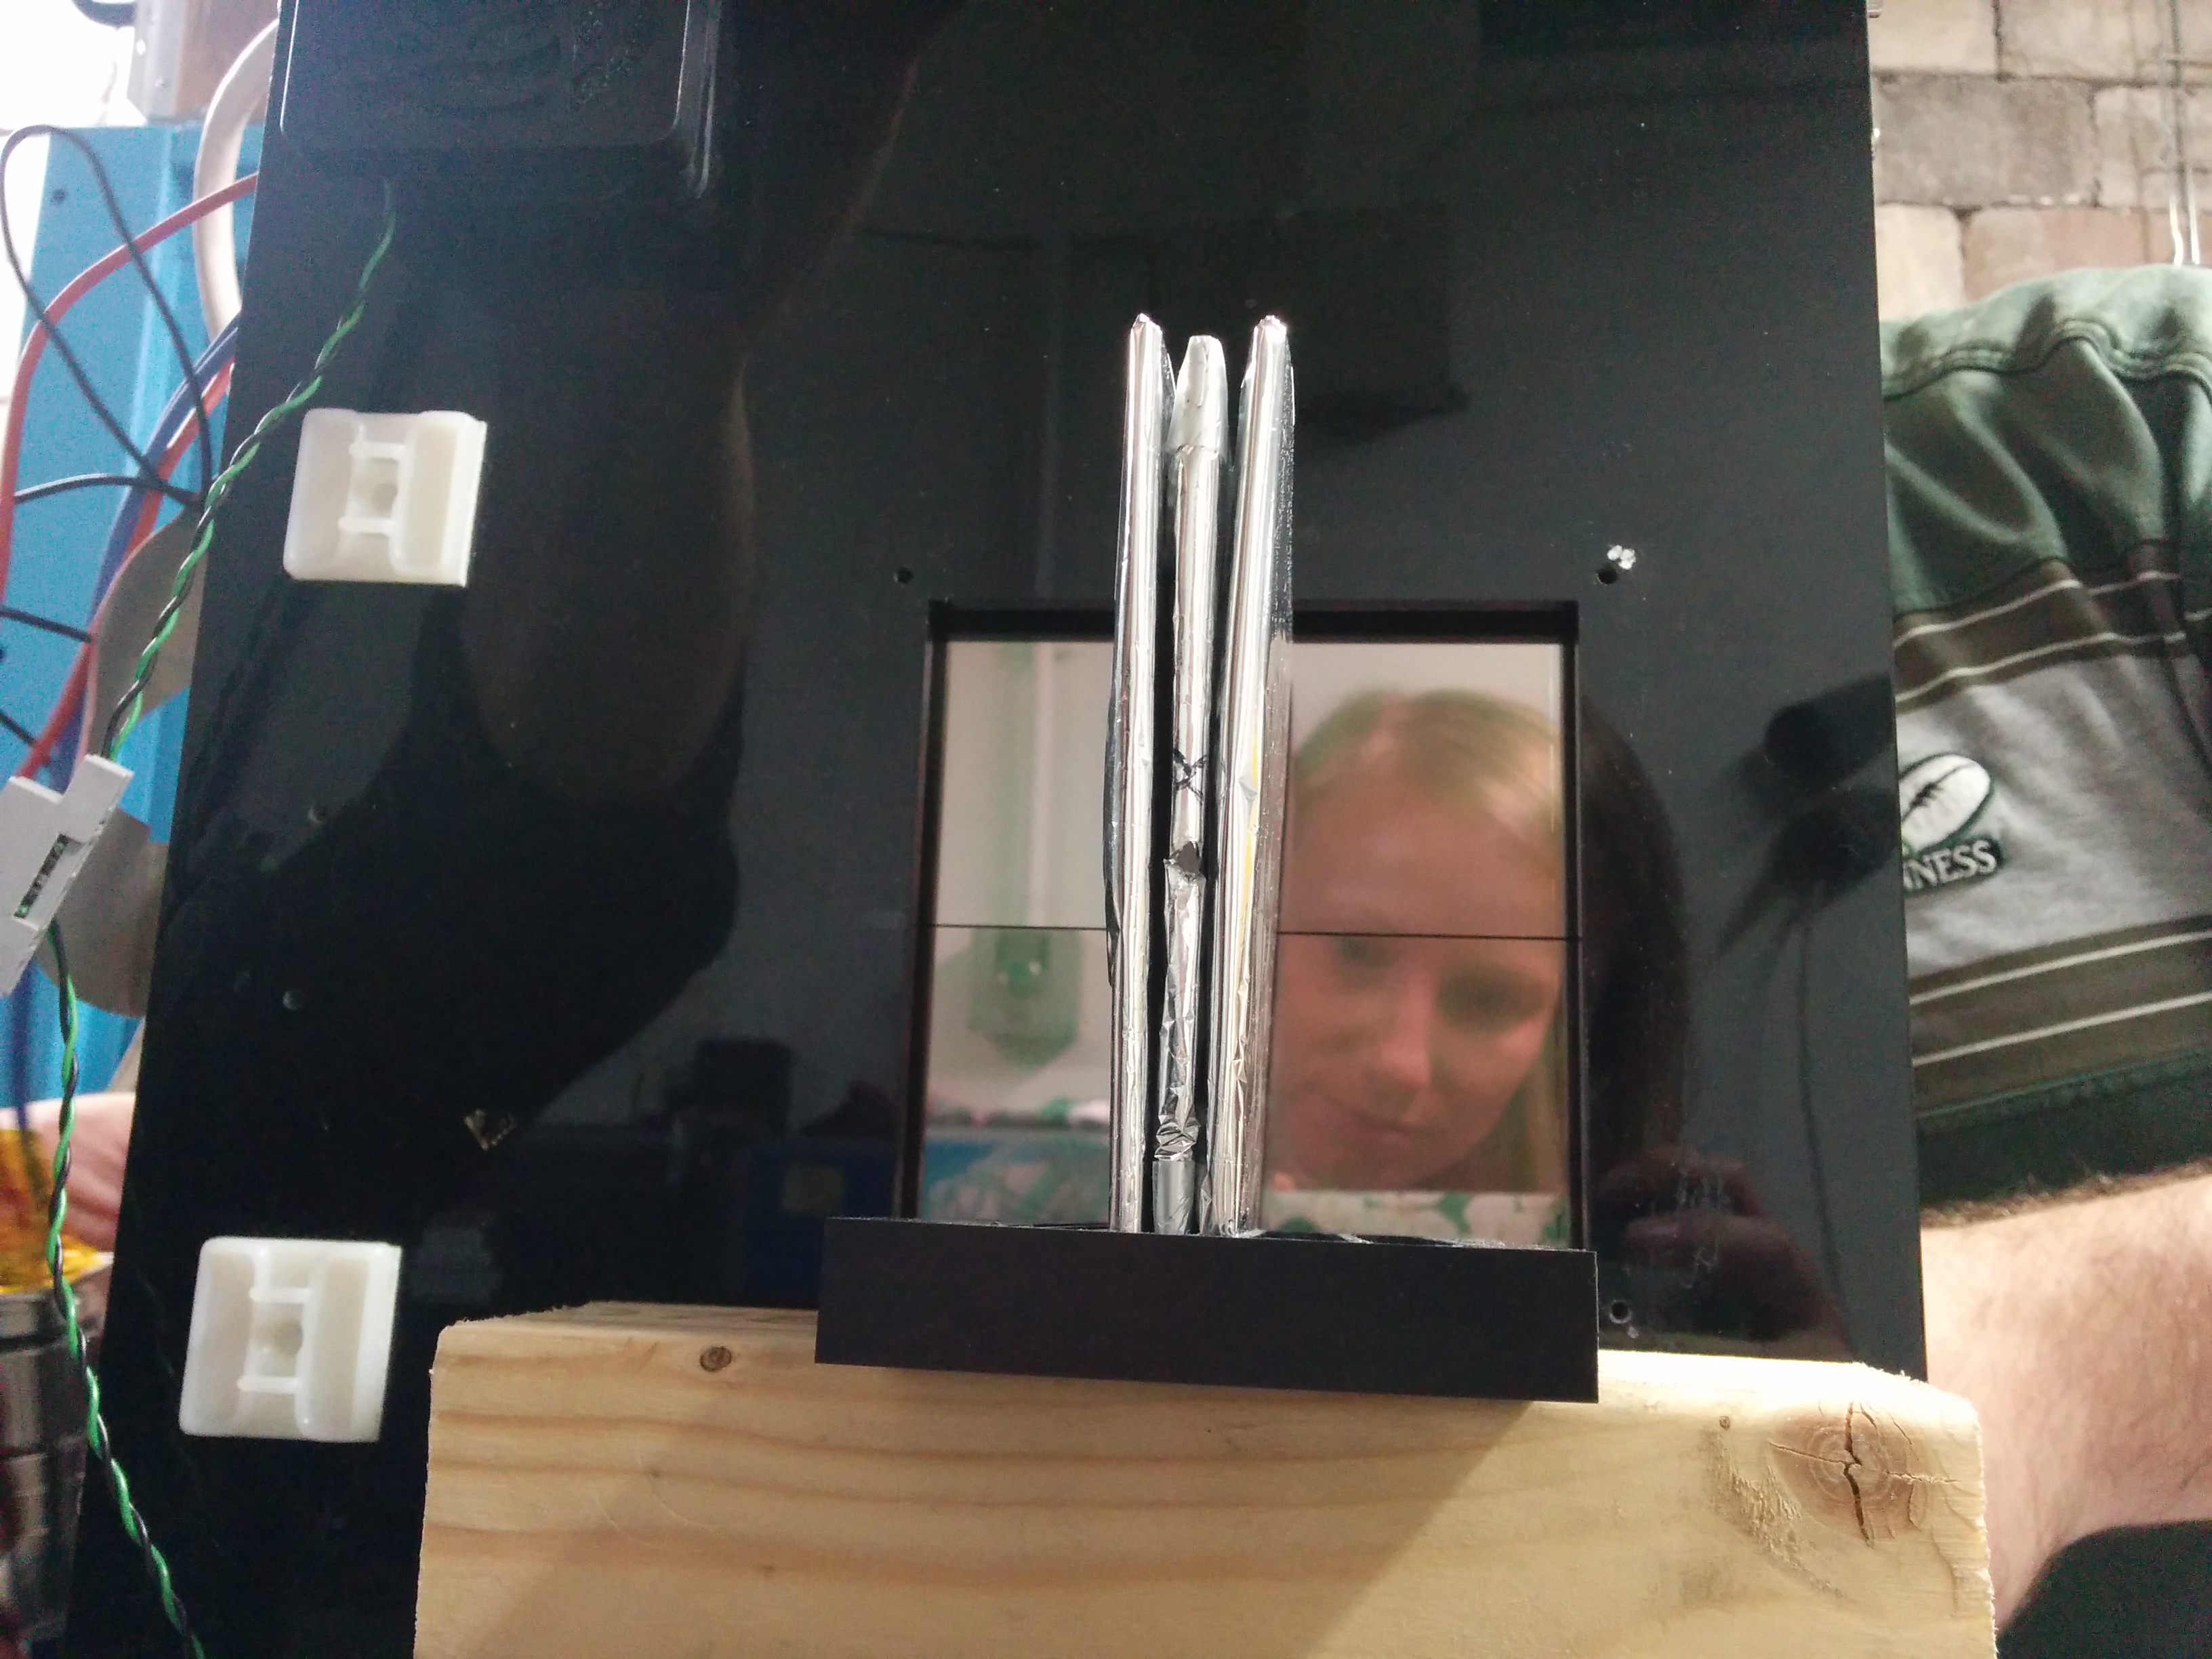
*The scintillator stack was quite well aligned with the horizontal centre of the beam. We did our best to align the vertical centre of the scintillator stack with the beam as well, however as can be seen from the image below, where the black "line" shows the divide between and hence the centre of the sensors, the beam hit just below centre: | |||
<div class="image400px" style="text-align: center;"> | |||
[http://www.hep.ucl.ac.uk/pbt/wikiData/images/Birmingham_sept2017/off_centre.jpg http://www.hep.ucl.ac.uk/pbt/wikiData/images/Birmingham_sept2017/off_centre.jpg] | |||
<br /> | |||
</div> | |||
*The working directory on the PRIAPUS computer where the data is stored is: | *The working directory on the PRIAPUS computer where the data is stored is: | ||
| Line 53: | Line 67: | ||
<br /> | <br /> | ||
</div> | </div> | ||
|| | *This setup remains in place until mentioned otherwise | ||
*Lights were left on for the first run. Data not useable! | |||
|| 28MeV_3mmscint_ABC_spread_10pA_1cmC | |||
|- | |||
|Beam || 10 pA || 3 x 3 mm || ABC || Lights off this time! || 28MeV_3mmscint_ABC_spread_10pA_1cmC_2 | |||
|- | |||
|Beam || 10 pA || 3 x 3 mm || ABC || Repeat measurement for reproducibility || 28MeV_3mmscint_ABC_spread_10pA_1cmC_3 | |||
|- | |||
|Beam direction || N/A || N/A || N/A || | |||
*Measure the direction of the beam relative to the screen by shining a laser on the sensor to make sure we understand the Bragg Peak that we see | |||
*Saturation of the sensor | |||
|| Laser_beam_direction | |||
|- | |||
|Beam direction || N/A || N/A || N/A || | |||
*Cover some of the sensor not to saturate it | |||
*Beam direction determined to be (for the top panel display): | |||
<div align="center"> SCREEN <--- BEAM </div> | |||
<div align="center"> (where the arrow represents the direction of the beam) </div> | |||
|| Laser_beam_direction_cover | |||
|- | |||
|Beam || 10 pA || 4 mm and 3 mm || 3A 4A || | |||
*Alignment: 4A [gap] 3A <--- BEAM | |||
*Lights were left on for this run. Data not useable! | |||
|| 28MeV_3mmA_4mmA_spread_10pA_1cmC | |||
|- | |||
|Beam || 10 pA || 4 mm and 3 mm || 3A 4A || Lights off this time! || 28MeV_3mmA_4mmA_spread_10pA_1cmC_2 | |||
|- | |||
|Beam || 10 pA || 4 mm and 3 mm || 3A 4A || Repeat measurement for reproducibility || 28MeV_3mmA_4mmA_spread_10pA_1cmC_3 | |||
|- | |||
|Beam || 10 pA || 3 mm and 4 mm || 4A 3A || | |||
*Scintillator plates switched around | |||
*Alignment" 3A [gap] 4A <--- BEAM | |||
|| 28MeV_4mmA_3mmA_spread_10pA_1cmC | |||
|- | |||
|Beam || 20 pA || 3 mm and 4 mm || 4A 3A || | |||
*Continue with this configuration and increase current until we get to the maximum current that won't saturate the sensors | |||
*First, double the current | |||
|| 28MeV_4mmA_3mmA_spread_20pA_1cmC | |||
|- | |||
|Beam || 25 pA || 3 mm and 4 mm || 4A 3A || | |||
*Increase current to 25 pA | |||
*Possible saturation of sensors | |||
|| 28MeV_4mmA_3mmA_spread_25pA_1cmC | |||
|- | |||
|Beam || 20 pA || 3 x 3 mm || ABC || | |||
*The maximum current before saturation is ~ 20 pA | |||
*Repeat tests with 3 scintillator plates at this current | |||
*Alignment: 3C [gap] 3B [gap] 3A <--- BEAM | |||
*Lights were left on for this run. Data not useable! | |||
|| 28MeV_3mmscint_ABC_spread_20pA_1cmC | |||
|- | |||
|Beam || 20 pA || 3 x 3 mm || ABC || | |||
*Lights off this time! | |||
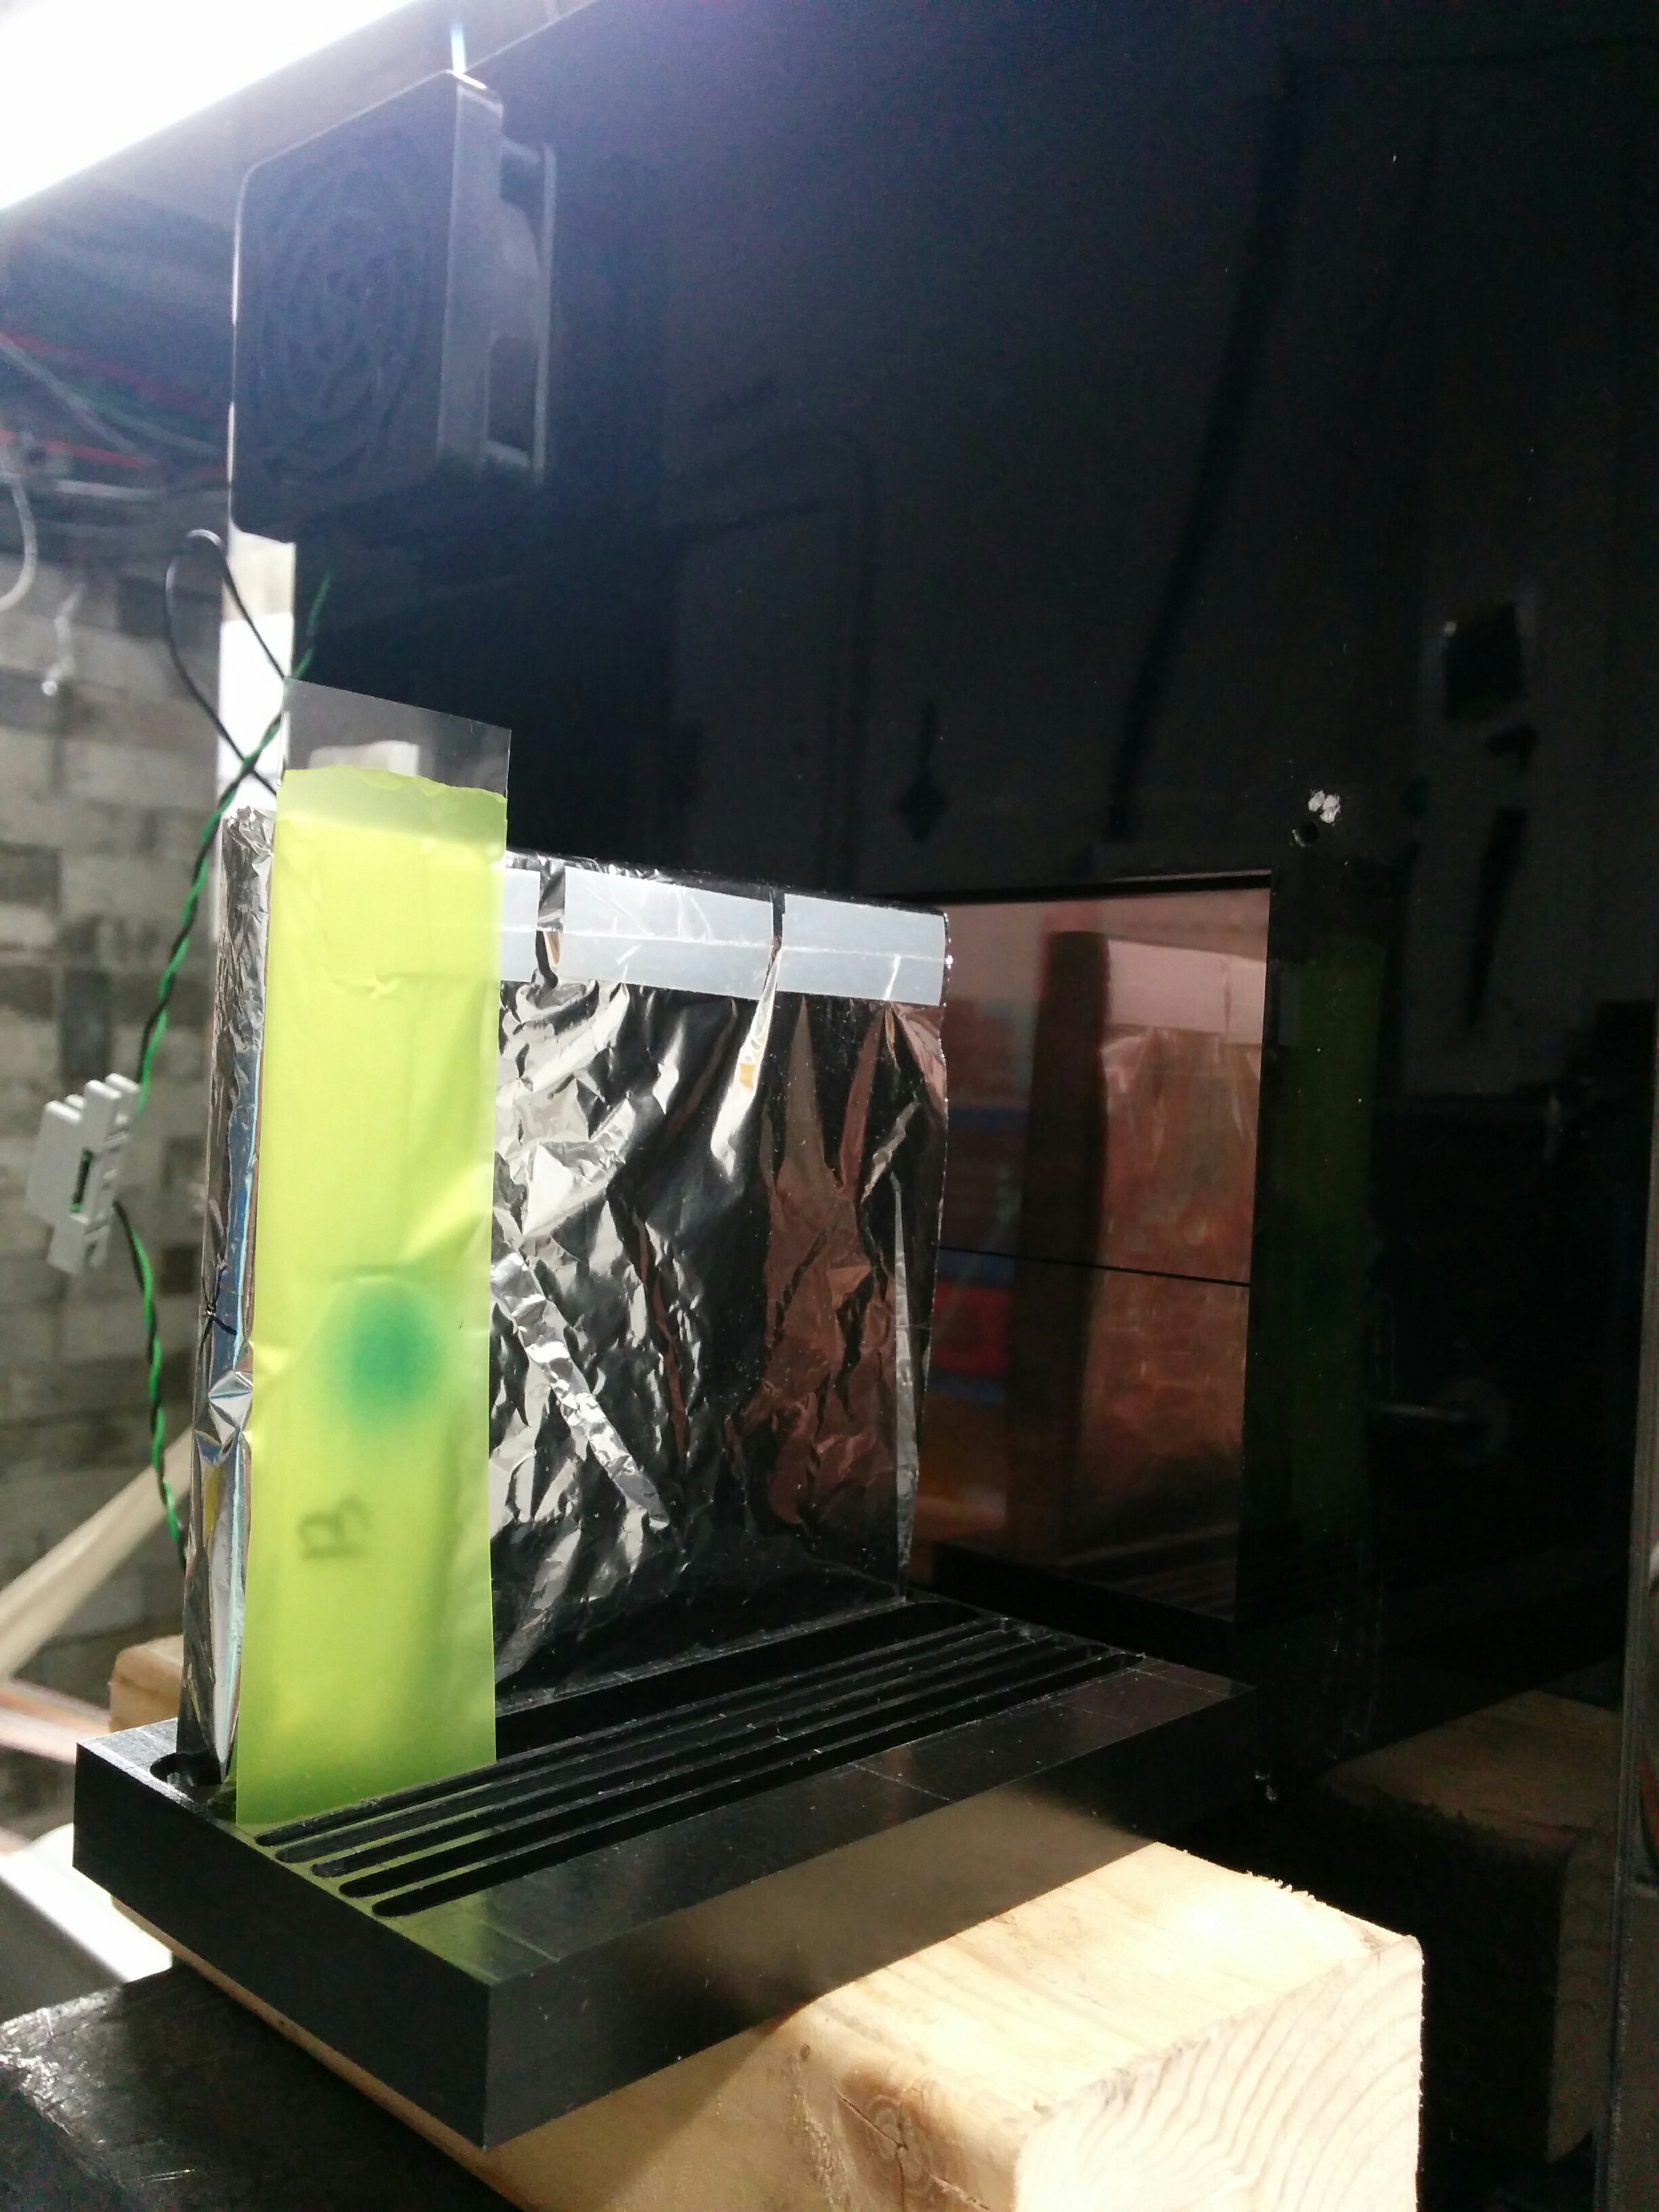
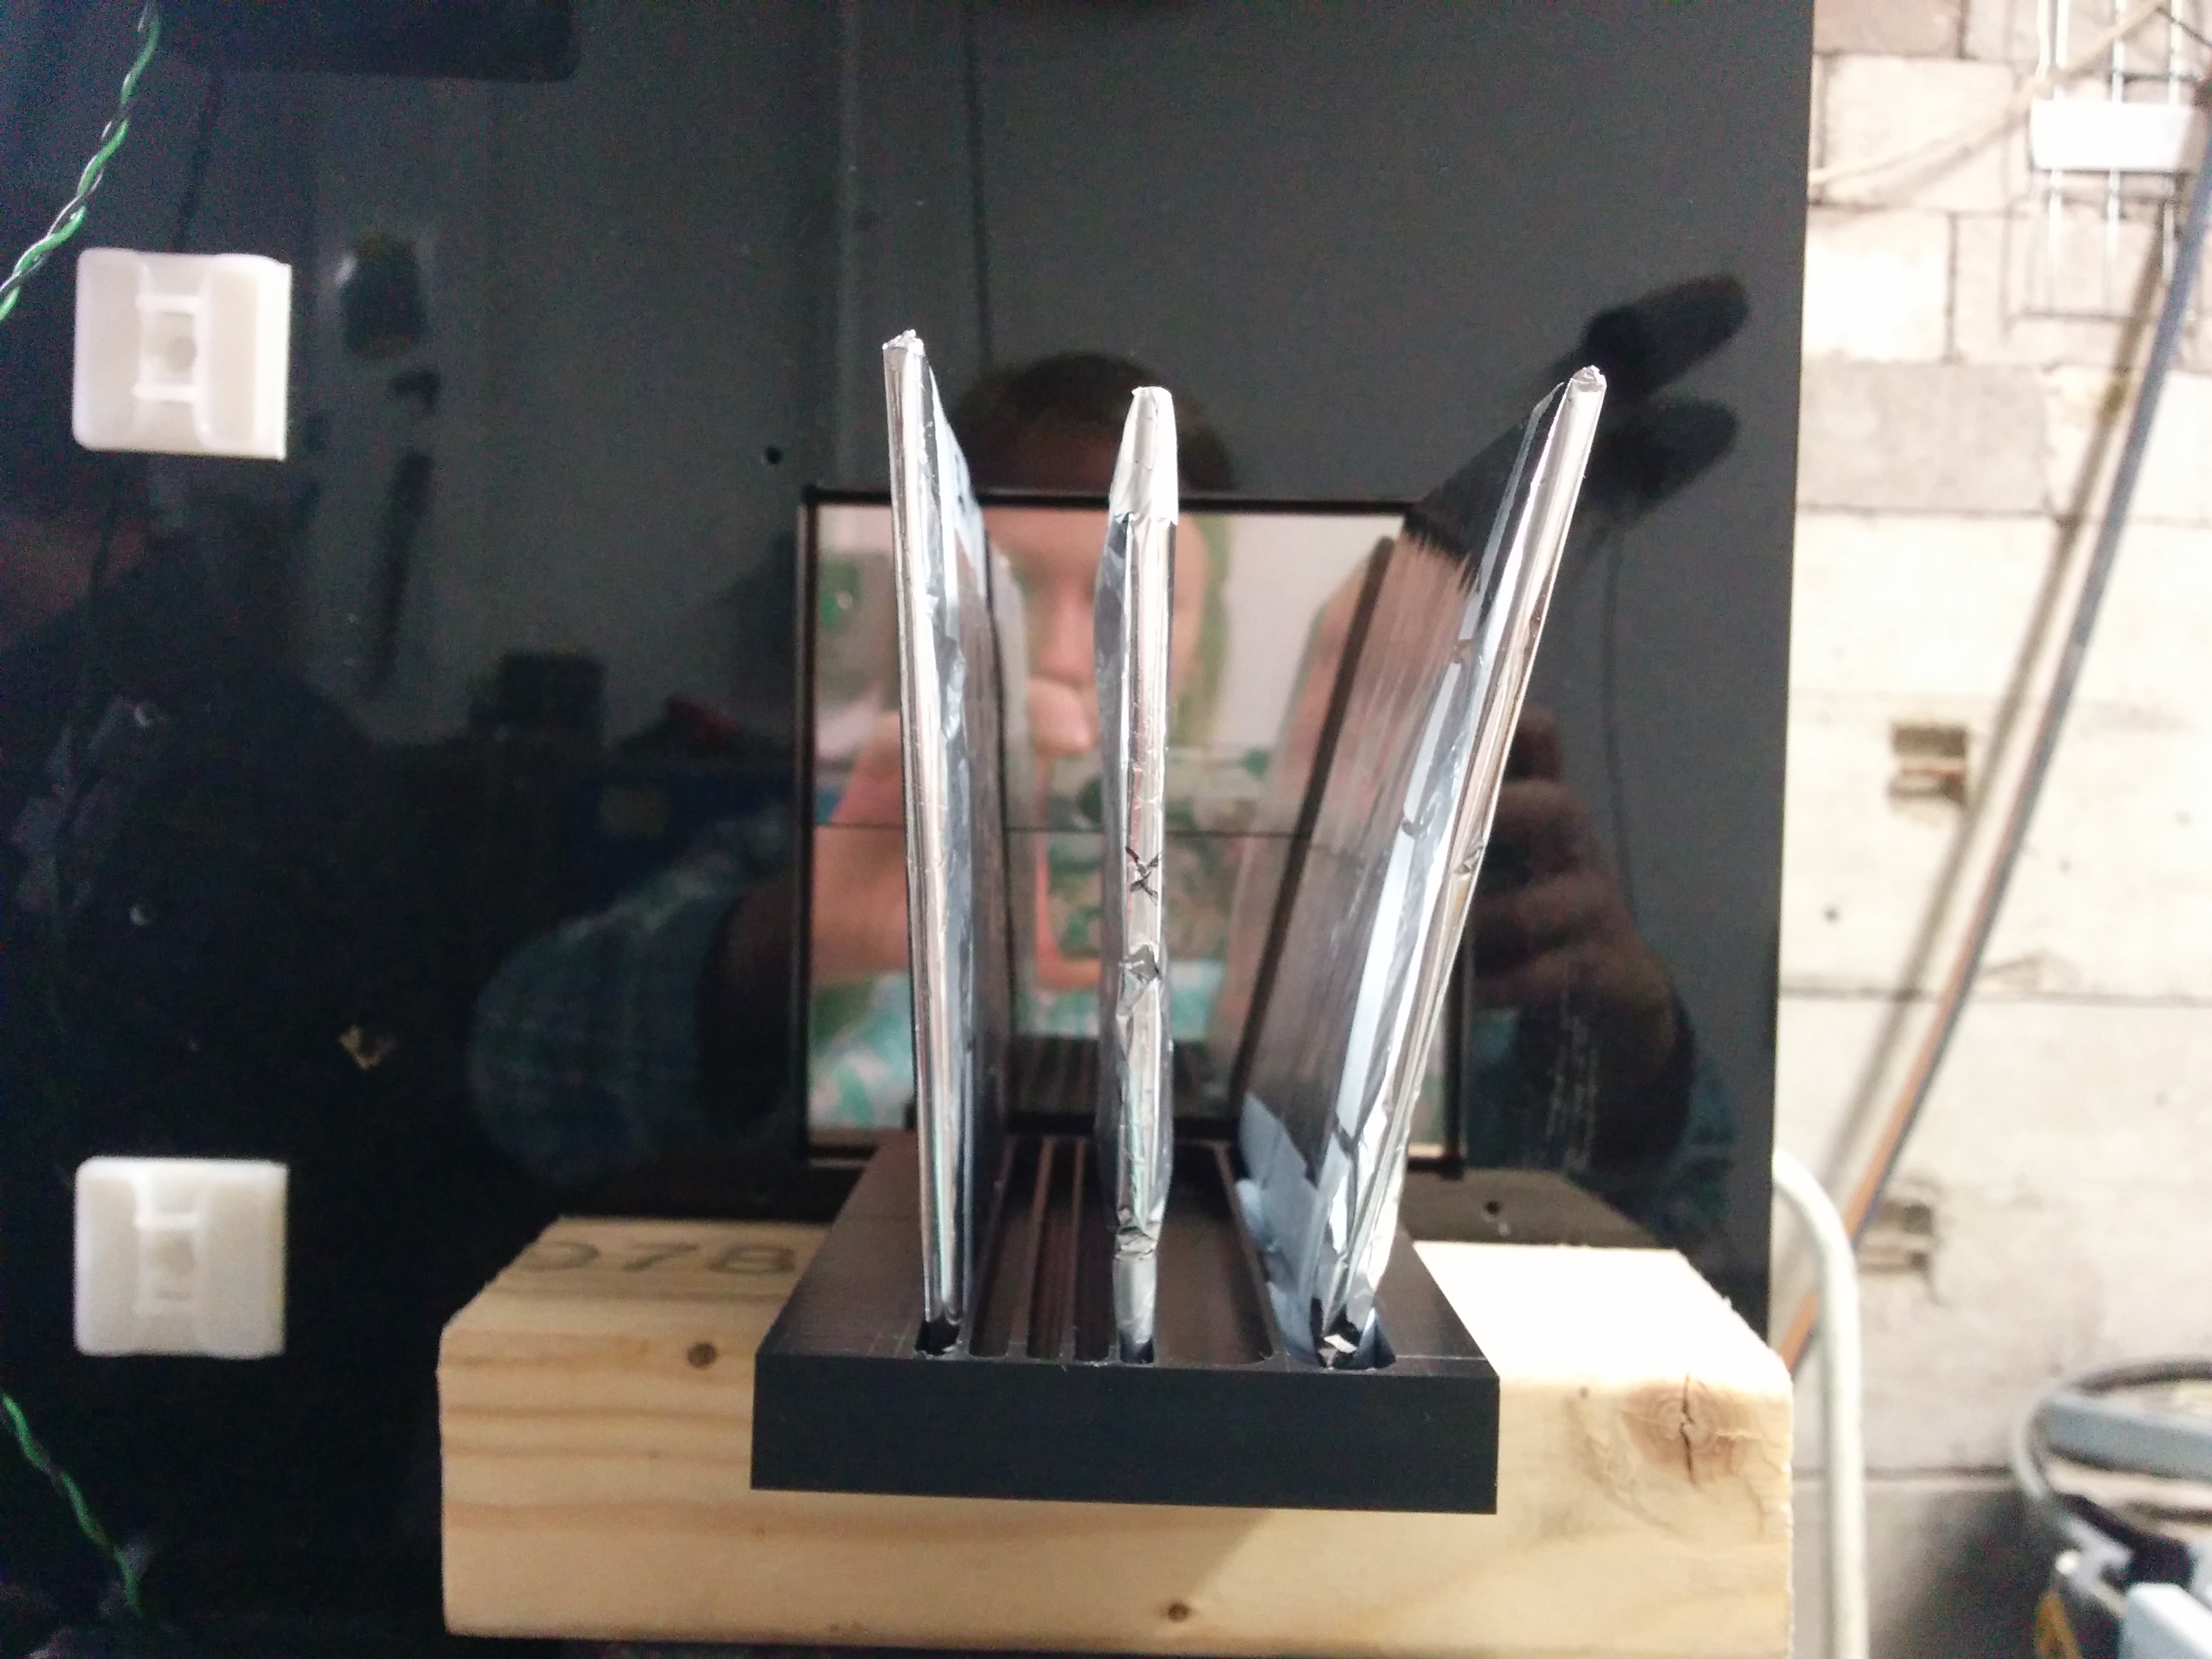
*The file preview showed that there is a tilt observed in the resulting data. This was caused by scintillator A tilting to the right in real life, as show in the below picture, which was taken just after the data run was taken: | |||
<div class="image400px" style="text-align: center;"> | |||
[http://www.hep.ucl.ac.uk/pbt/wikiData/images/Birmingham_sept2017/tilted_scintillators.jpg http://www.hep.ucl.ac.uk/pbt/wikiData/images/Birmingham_sept2017/tilted_scintillators.jpg] | |||
<br /> | |||
</div> | |||
|| 28MeV_3mmscint_ABC_spread_20pA_1cmC_2 | |||
|- | |||
|Beam || 20 pA || 3 x 3 mm || BCA || Alignment: 3A [gap] 3C [gap] 3B <--- BEAM || 28MeV_3mmscint_BCA_spread_20mA_1cmC | |||
|- | |||
|Background || N/A || 3 x 3 mm || BCA || || Background_2 | |||
|- | |||
|Beam || 20 pA || 3 x 3 mm || BCA || | |||
*Alignment: 3A [gap] 3C [gap] 3B <--- BEAM | |||
*Blue tack used to keep scintillator plates straighter and test repeated with the same alignment. | |||
*Lights were left on for this run. Data not useable! | |||
|| 28MeV_3mmscint_BCA_spread_20mA_1cmC_2 | |||
|- | |||
|Beam || 20 pA || 3 x 3 mm || BCA || Lights off this time! || 28MeV_3mmscint_BCA_spread_20mA_1cmC_3 | |||
|- | |||
|Beam || 20 pA || 3 x 3 mm || CAB || | |||
*Alignment: 3B [gap] 3A [gap] 3C <--- BEAM! | |||
*The tiles remained straighter for this run! | |||
|| 28MeV_3mmscint_CAB_spread_20pA_1cmC | |||
|- | |||
|Beam || 20 pA || 3 mm and 4 mm || 4A 3A || Alignment: 3A 4A <--- BEAM || 28MeV_4mmA_3mmA_spread_20pA_1cmC | |||
|- | |||
|Beam || 20 pA || 3 mm and 4 mm || 4B 3A || Alignment: 3A 4B <--- BEAM || 28MeV_4mmB_3mmA_spread_20pA_1cmC | |||
|- | |||
|Beam || 20 pA || 1 x 10 mm || 10 A || | |||
*Data taking resumed after short lunch break (in case this is of any relevance to any change in data caused by the beam being switched off for a short while) | |||
*Alignment: 10A <--- BEAM | |||
|| 28MeV_10mmA_20pA_1cmC | |||
|- | |||
|Background || N/A || 1 x 10 mm || 10A || || Background_3 | |||
|- | |||
|Beam || 20 pA || 1 x 10 mm || 10B || Alignment: 10B <--- BEAM || 28MeV_10mmB_20pA_1cmC | |||
|- | |||
|Beam || 10 pA || 1 x 10 mm || 10B || Decrease the current by a factor of 2 until we don't see anything above background || 28MeV_10mmB_10pA_1cmC | |||
|- | |||
|Beam || 5 pA || 1 x 10 mm || 10B || Current decreased by another factor of 2 || 28MeV_10mmB_5pA_1cmC | |||
|- | |||
|Beam || 2.5 pA || 1 x 10 mm || 10B || Current decreased by another factor of 2 || 28MeV_10mmB_2-5pA_1cmC | |||
|- | |||
|Beam || 1.25 pA || 1 x 10 mm || 10B || Current decreased by another factor of 2 || 28MeV_10mmB_1-25pA_1cmC | |||
|- | |||
|Beam || 20 pA || 1 x 10 mm || 10B || | |||
*Current brought back up to 20 pA | |||
*10 repeats of 1 second frames recorded, with _1, _2 etc. appended to file name | |||
*Current dropped off slightly during acquisition | |||
|| 28MeV_10mmB_20pA_1cmC_repeat | |||
|- | |||
|Beam || 20 pA || 1 x 10 mm || 10B || | |||
*The setup has been moved off-centre to check for uniformity, with the beam hitting the right edge of the scintillator (when looking into the beam) | |||
*The beam was also checked with a film placed on the scintillator to make sure the beam was hitting, and not missing, the scintillator | |||
*10 repeats of 1 second frames recorded, with _1, _2 etc. appended to file name | |||
|| 28MeV_10mmB_20pA_1cmC_right | |||
|- | |||
|Beam || 20 pA || 1 x 10 mm || 10B || | |||
*Plate 10B was removed from the stand and brought closer to the sensor to reduce the gap between the scintillator and the sensor to ~ 2mm at the bottom (and the gap slightly increasing towards the top, so the scintillator leans away from the sensor as it gets to the top of the sensor) | |||
*Very saturated data! | |||
|| 28MeV_10mmB_20pA_1mcC_close | |||
|- | |||
|Beam || 10 pA || 1 x 10 mm || 10B || | |||
*Reduce current by factor of 2 | |||
*Still see some slight saturation | |||
|| 28MeV_10mmB_10pA_1mcC_close | |||
|- | |||
|Beam || 7 pA || 1 x 10 mm || 10 B || | |||
*Further reduce current | |||
*No saturation seen | |||
|| 28MeV_10mmB_7pA_1cmC_close | |||
|- | |||
|Beam || 7 pA || 3 x 3 mm || ABC || | |||
*3 scintillator plates brought close to the sensor, taped together for stability so therefore without any separation | |||
*Alignment: 3C [gap] 3B [gap] 3A <--- BEAM | |||
|| 28MeV_3mmscint_ABC_7pA_1mcC_close | |||
|- | |||
|Beam || 5 pA || 3 x 3 mm || ABC || Current dropped to 5 pA in hope of seeing more separation with less light || 28MeV_3mmscint_ABC_4pA_1mcC_close | |||
|} | |||
== Conclusions == | |||
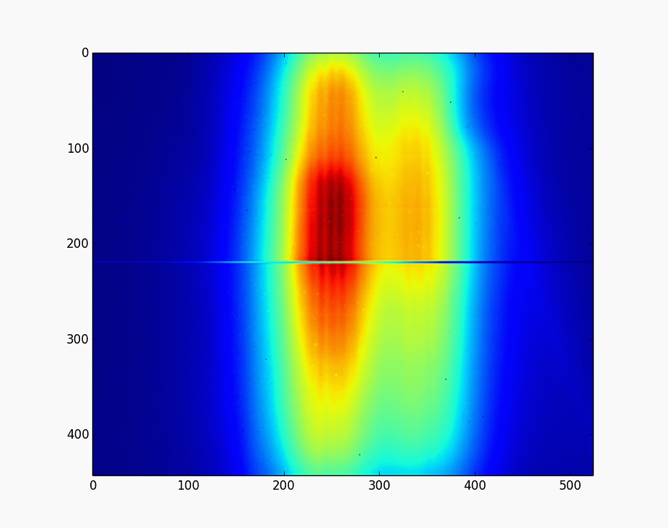
*A very successful first test beam at Birmingham, where we could see the Bragg Peak when using two plates (3 mm and 4 mm): | |||
<div class="image600px" style="text-align: center;"> | |||
[http://www.hep.ucl.ac.uk/pbt/wikiData/images/Birmingham_sept2017/4mmA_3mmA_spread_20pA.png http://www.hep.ucl.ac.uk/pbt/wikiData/images/Birmingham_sept2017/4mmA_3mmA_spread_20pA.png] | |||
<br /> | |||
</div> | |||
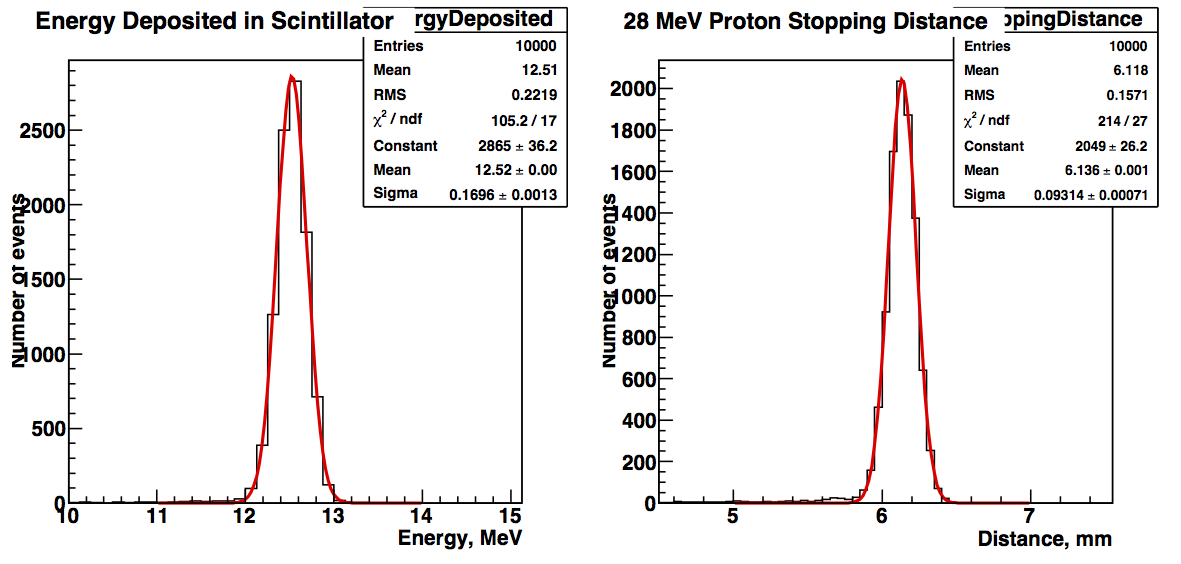
*Simulations were carried out of a 28 MeV proton energy and a 5 mm radius beam, with 10,000 events. The resulting energy deposited and the stopping distance can be seen below: | |||
<div class="image600px" style="text-align: center;"> | |||
[http://www.hep.ucl.ac.uk/pbt/wikiData/images/Birmingham_sept2017/28MeV_4mmRadius.jpg http://www.hep.ucl.ac.uk/pbt/wikiData/images/Birmingham_sept2017/28MeV_4mmRadius.jpg] | |||
<br /> | |||
</div> | |||
The stopping distance is ~ 6.1 mm, according to simulations. This agrees with the test beam where the Bragg peak is seen as two points in two plates totalling up to a total of 7 mm of scintillator. | |||
*Full data analysis still to be carried out! | |||
Latest revision as of 15:56, 19 September 2017
Beam tests of the Nuvia 10 mm, 4 mm and 3 mm scintillator sheets with PRaVDA CMOS pixel sensors (PRIAPUS) at the Birmingham Cyclotron with a 28 MeV beam.
Pre-data Taking Information and Notes
- The tests were carried out with an energy of 28 MeV (32 MeV was unavailable as the cyclotron had recently been through repairs). No Bragg Peak measurement was carried out to confirm the exact beam energy due to time restrictions.
- The beam was run without a scattering foil. A 1 cm diameter uniform beam was achieved by placing a 1 cm collimator in the beam, with a beam scan onto film confirming the size. An ionisation chamber was placed upstream of the collimator to accurately monitor the current.
- The dynamic range of the CMOS sensors is 14 bits. The electron conversion value from ADC is 50 electrons per ADC value. The measurements to establish this were carried out at the beginning of experimentation with the sensors and this value may have changed due to radiation damage etc.
- From previous measurements, the average background value per pixel is ~ 700.
- The data was recorded at 45 frames/second.
- The scintillator stack was set up perpendicular to the proton beam, with the exposed sides of the scintillator facing the sensors:
- The scintillator stack was quite well aligned with the horizontal centre of the beam. We did our best to align the vertical centre of the scintillator stack with the beam as well, however as can be seen from the image below, where the black "line" shows the divide between and hence the centre of the sensors, the beam hit just below centre:
- The working directory on the PRIAPUS computer where the data is stored is:
idMateData\Bham070917\
- The directory the data is stored at UCL in is:
/unix/pbt/data/birmingham/sept_2017
Data Taking
| Type of run | Current | Scintillator sheets used | Scintillator arrangement | Notes | File name |
|---|---|---|---|---|---|
| Background | N/A | 3 x 3 mm | ABC |
|
Background_1 |
| Beam | 1 nA | 3 x 3 mm | ABC | Saturation of sensor, ADC values at 14,000 | 28MeV_3mmscint_ABC_1nA_1cmC |
| Beam | 0.1 nA | 3 x 3 mm | ABC |
|
28MeV_3mmscint_ABC_100pA_1cmC_1 |
| Beam | 0.1 nA | 3 x 3 mm | ABC | Saturation of sensor | 28MeV_3mmscint_ABC_100pA_1cmC_2 |
| Beam | 10 pA | 3 x 3 mm | ABC | Sensor no longer saturated, but no separation due to formation of tiles | 28MeV_3mmscint_ABC_10pA_1cmC |
| Beam | 10 pA | 3 x 3 mm | ABC |
|
28MeV_3mmscint_ABC_spread_10pA_1cmC |
| Beam | 10 pA | 3 x 3 mm | ABC | Lights off this time! | 28MeV_3mmscint_ABC_spread_10pA_1cmC_2 |
| Beam | 10 pA | 3 x 3 mm | ABC | Repeat measurement for reproducibility | 28MeV_3mmscint_ABC_spread_10pA_1cmC_3 |
| Beam direction | N/A | N/A | N/A |
|
Laser_beam_direction |
| Beam direction | N/A | N/A | N/A |
SCREEN <--- BEAM
(where the arrow represents the direction of the beam)
|
Laser_beam_direction_cover |
| Beam | 10 pA | 4 mm and 3 mm | 3A 4A |
|
28MeV_3mmA_4mmA_spread_10pA_1cmC |
| Beam | 10 pA | 4 mm and 3 mm | 3A 4A | Lights off this time! | 28MeV_3mmA_4mmA_spread_10pA_1cmC_2 |
| Beam | 10 pA | 4 mm and 3 mm | 3A 4A | Repeat measurement for reproducibility | 28MeV_3mmA_4mmA_spread_10pA_1cmC_3 |
| Beam | 10 pA | 3 mm and 4 mm | 4A 3A |
|
28MeV_4mmA_3mmA_spread_10pA_1cmC |
| Beam | 20 pA | 3 mm and 4 mm | 4A 3A |
|
28MeV_4mmA_3mmA_spread_20pA_1cmC |
| Beam | 25 pA | 3 mm and 4 mm | 4A 3A |
|
28MeV_4mmA_3mmA_spread_25pA_1cmC |
| Beam | 20 pA | 3 x 3 mm | ABC |
|
28MeV_3mmscint_ABC_spread_20pA_1cmC |
| Beam | 20 pA | 3 x 3 mm | ABC |
|
28MeV_3mmscint_ABC_spread_20pA_1cmC_2 |
| Beam | 20 pA | 3 x 3 mm | BCA | Alignment: 3A [gap] 3C [gap] 3B <--- BEAM | 28MeV_3mmscint_BCA_spread_20mA_1cmC |
| Background | N/A | 3 x 3 mm | BCA | Background_2 | |
| Beam | 20 pA | 3 x 3 mm | BCA |
|
28MeV_3mmscint_BCA_spread_20mA_1cmC_2 |
| Beam | 20 pA | 3 x 3 mm | BCA | Lights off this time! | 28MeV_3mmscint_BCA_spread_20mA_1cmC_3 |
| Beam | 20 pA | 3 x 3 mm | CAB |
|
28MeV_3mmscint_CAB_spread_20pA_1cmC |
| Beam | 20 pA | 3 mm and 4 mm | 4A 3A | Alignment: 3A 4A <--- BEAM | 28MeV_4mmA_3mmA_spread_20pA_1cmC |
| Beam | 20 pA | 3 mm and 4 mm | 4B 3A | Alignment: 3A 4B <--- BEAM | 28MeV_4mmB_3mmA_spread_20pA_1cmC |
| Beam | 20 pA | 1 x 10 mm | 10 A |
|
28MeV_10mmA_20pA_1cmC |
| Background | N/A | 1 x 10 mm | 10A | Background_3 | |
| Beam | 20 pA | 1 x 10 mm | 10B | Alignment: 10B <--- BEAM | 28MeV_10mmB_20pA_1cmC |
| Beam | 10 pA | 1 x 10 mm | 10B | Decrease the current by a factor of 2 until we don't see anything above background | 28MeV_10mmB_10pA_1cmC |
| Beam | 5 pA | 1 x 10 mm | 10B | Current decreased by another factor of 2 | 28MeV_10mmB_5pA_1cmC |
| Beam | 2.5 pA | 1 x 10 mm | 10B | Current decreased by another factor of 2 | 28MeV_10mmB_2-5pA_1cmC |
| Beam | 1.25 pA | 1 x 10 mm | 10B | Current decreased by another factor of 2 | 28MeV_10mmB_1-25pA_1cmC |
| Beam | 20 pA | 1 x 10 mm | 10B |
|
28MeV_10mmB_20pA_1cmC_repeat |
| Beam | 20 pA | 1 x 10 mm | 10B |
|
28MeV_10mmB_20pA_1cmC_right |
| Beam | 20 pA | 1 x 10 mm | 10B |
|
28MeV_10mmB_20pA_1mcC_close |
| Beam | 10 pA | 1 x 10 mm | 10B |
|
28MeV_10mmB_10pA_1mcC_close |
| Beam | 7 pA | 1 x 10 mm | 10 B |
|
28MeV_10mmB_7pA_1cmC_close |
| Beam | 7 pA | 3 x 3 mm | ABC |
|
28MeV_3mmscint_ABC_7pA_1mcC_close |
| Beam | 5 pA | 3 x 3 mm | ABC | Current dropped to 5 pA in hope of seeing more separation with less light | 28MeV_3mmscint_ABC_4pA_1mcC_close |
Conclusions
- A very successful first test beam at Birmingham, where we could see the Bragg Peak when using two plates (3 mm and 4 mm):
- Simulations were carried out of a 28 MeV proton energy and a 5 mm radius beam, with 10,000 events. The resulting energy deposited and the stopping distance can be seen below:
The stopping distance is ~ 6.1 mm, according to simulations. This agrees with the test beam where the Bragg peak is seen as two points in two plates totalling up to a total of 7 mm of scintillator.
- Full data analysis still to be carried out!
