Software/Geant4/Tutorials/Basic/Monoenergetic Proton Pencil Beam
Monoenergetic Proton Pencil Beam
This example shows the dose distribution in water along the incident proton beam. The beam hits the water cube surface and deposits a dose under the surface of the water. The volume of the water cube is divided into slices perpendicular to the incident beam. At each slice the deposited dose and energy is computed.
The slices are created using class G4PVReplica.
The energy and the dose are scored using classes G4UserSteppingAction and G4UserRunAction.
Alternatively, the energy and the dose are scored using class G4ScoringManager by defining two scoring meshes in longitudinal and lateral direction of the beam.
More information about the scoring meshes can be found here.
The protons are generated using G4ParticleGun class.
There is an option to chose among several EM and the QGSP_BIC_EMY physics lists.
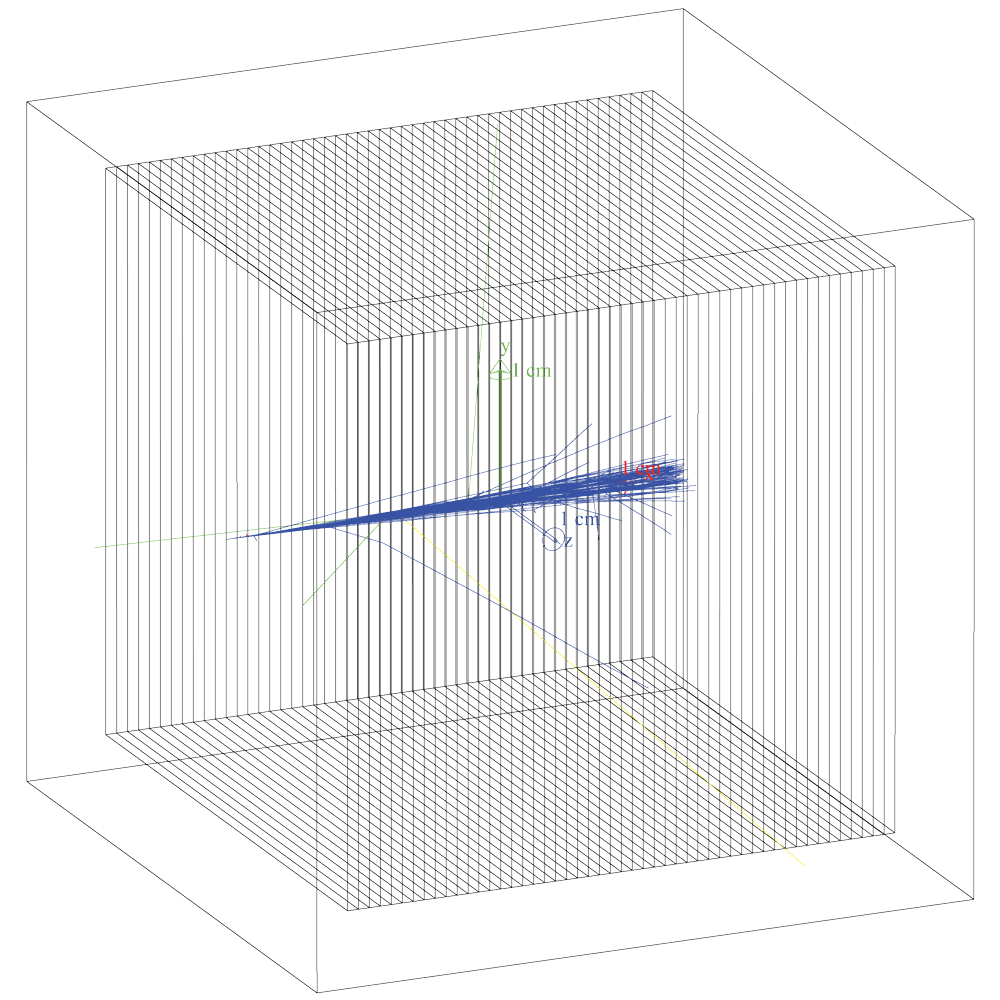
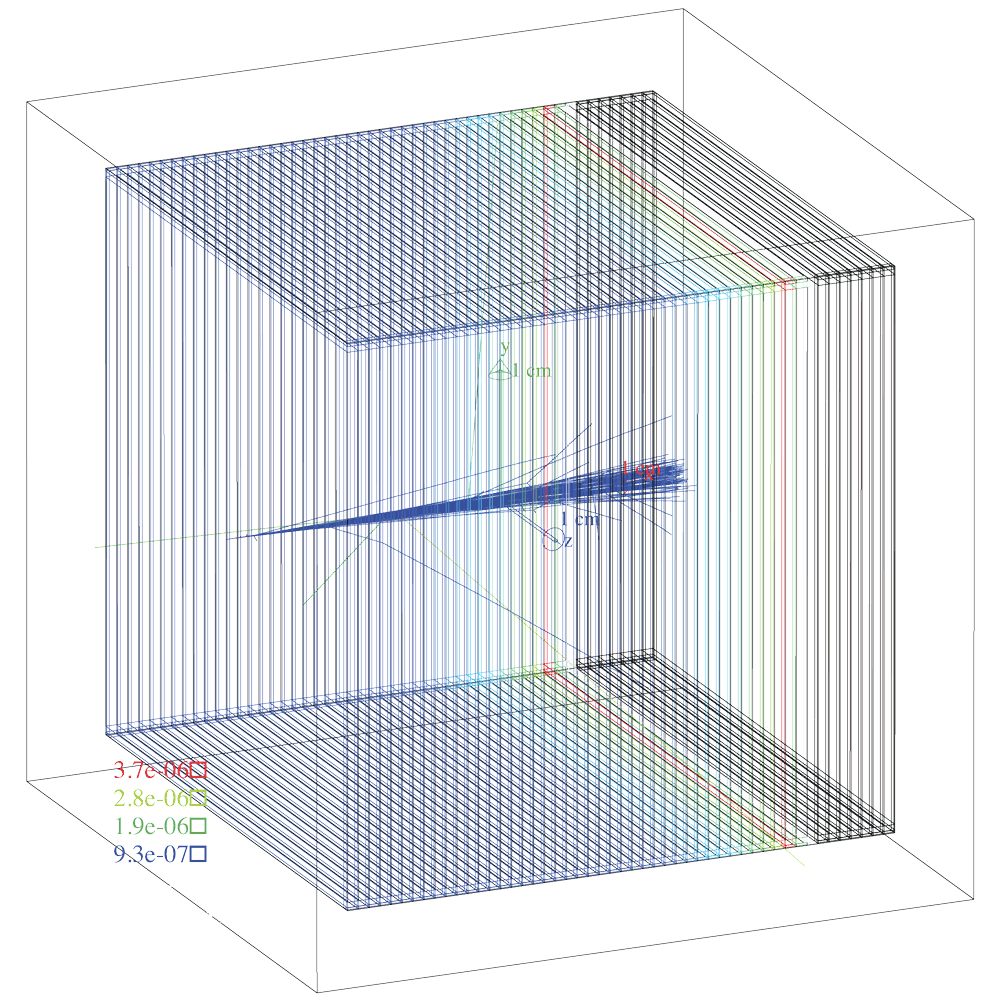
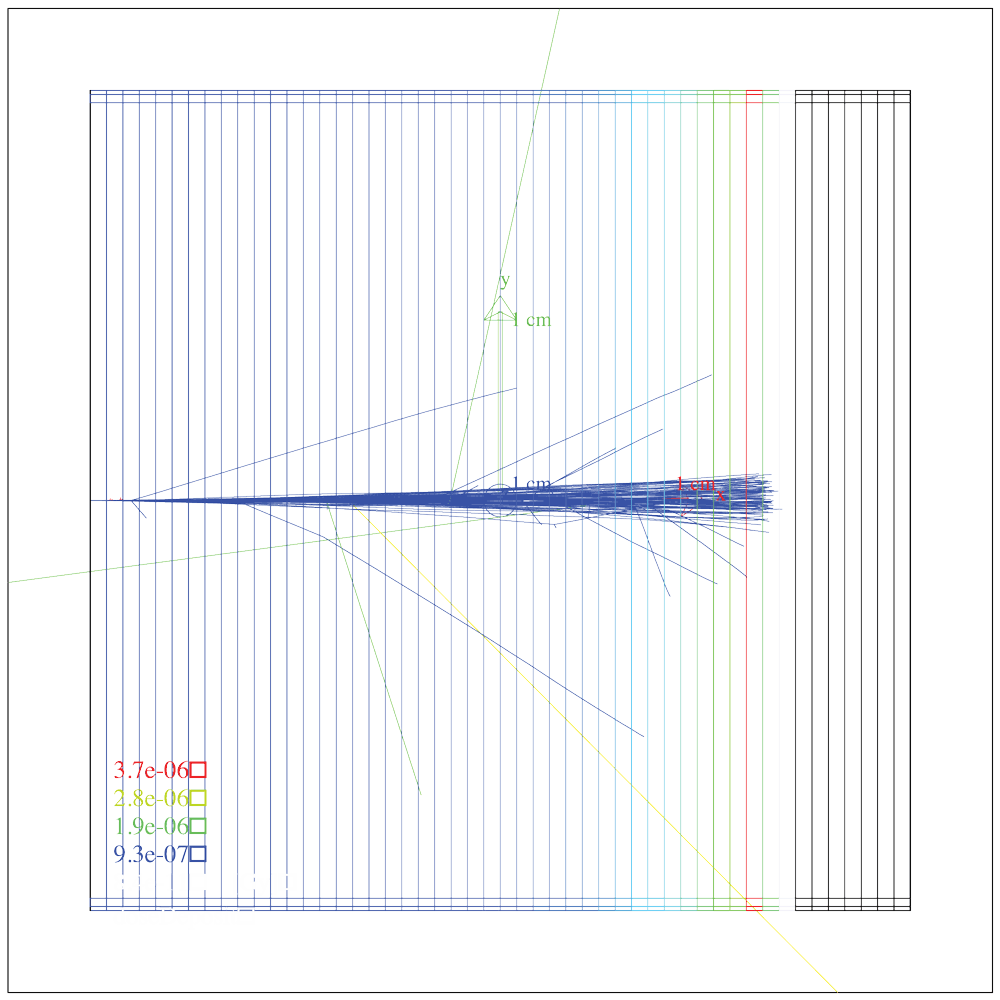
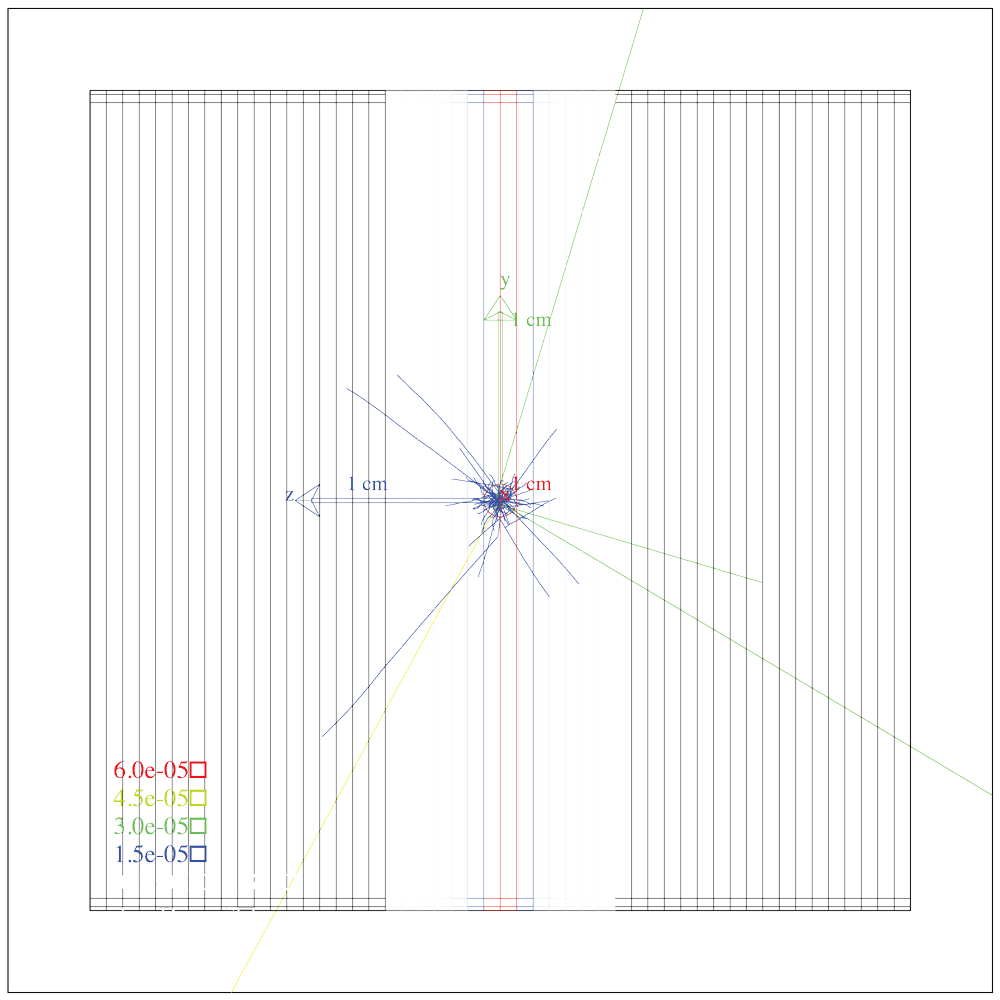
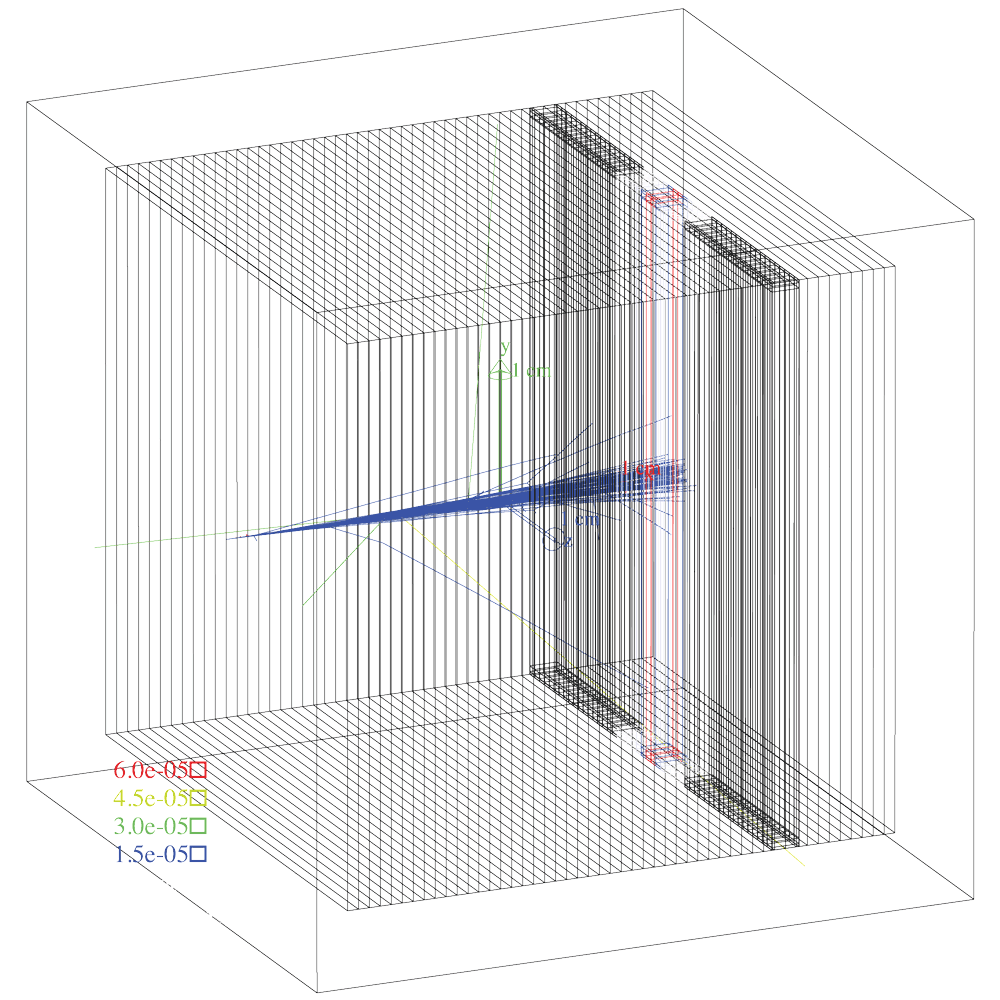
The image shows the water box divided into slices using class G4PVReplica.
Protons are in blue, photons are in green.
Running the Tutorial
All the source files for the tutorial can be found in http://www.hep.ucl.ac.uk/pbt/wikiData/code/ProtonPB/.
The corresponding data files are available from http://www.hep.ucl.ac.uk/pbt/wikiData/data/ProtonPB/.
Create folder ProtonPBFolder
ssh -X username@plus1.hep.ucl.ac.uk

username@plus1.hep.ucl.ac.uk's password: type your password here

[username@plus1 ~]$ mkdir ProtonPBFolder

[username@plus1 ~]$ cd ProtonPBFolder
Setup Your Environment
[username@plus1 ProtonPBFolder]$ source /unix/pbt/software/scripts/pbt.sh
Copy the Code to Your Working Directory and Rename It
[username@plus1 ProtonPBFolder]$ cp -rv /unix/pbt/tutorials/basic/ProtonPB .

[username@plus1 ProtonPBFolder]$ mv ProtonPB ProtonPB_source
Create the Build Directory
[username@plus1 ProtonPBFolder]$ mkdir ProtonPB_build
Compile the Code with Make and Cmake
[username@plus1 ProtonPBFolder]$ cd ProtonPB_build

[username@plus1 ProtonPB_build]$ cmake -DGeant4_DIR=/unix/pbt/software/dev /home/username/ProtonPBFolder/ProtonPB_source

[username@plus1 ProtonPB_build]$ make
Run Macro proton.mac
[username@plus1 ProtonPB_build]$ ./protonPB proton.mac
Analysing the Data
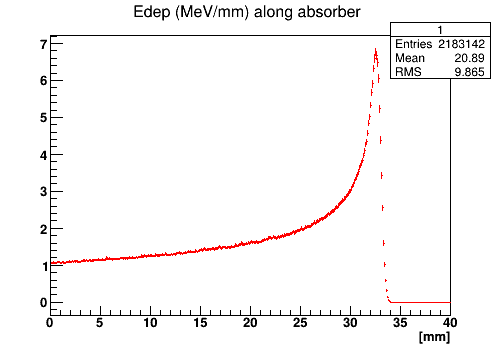
The macro produces a root file Proton.root with two histograms.
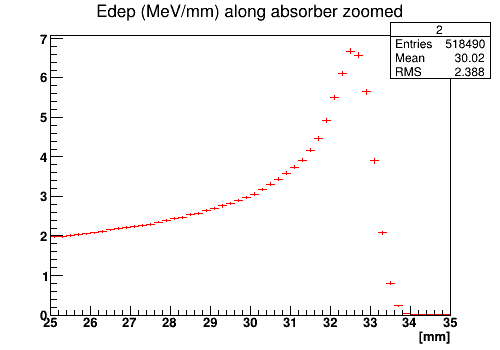
The first histogram shows the energy deposition in water box along the beam line, the second histogram shows zoomed energy deposition around the peak.
The macro also produces several text files.
- The data in files
DoseFile.txtandPlotDose.txtwas created using classesG4UserSteppingActionandG4UserRunAction. The fileDoseFile.txtcontains energy and dose deposition for every layer. The filePlotDose.txtcontains only depth vs dose for each layer. These text files can be analyzed with MATLAB or ROOT.
- The files
DoseLongitudinalMesh.txt,EnergyLongitudinalMesh.txt,DoseLateralMesh.txtandEnergyLateralMesh.txtcontain information about the dose and energy deposition in voxels in longitudinal and lateral direction of the beam. The data was created using classG4ScoringManagerand commands/score/in proton.mac. These text files can be analyzed with MATLAB or ROOT.
- The two ways to record data should give similar result.
Text files
This is output from DoseFile.txt with physics process QGSP_BIC_EMY and incident proton energy of 62 MeV.
Use your favorite editor pico, vi, emacs etc to open text files.
For example, open this text file with editor pico:
[username@plus1 ProtonPB_build]$ pico DoseFile.txt
DoseFile.txt
 Layers :	x[mm]  	Edep 	    Edep/Ebeam[%]  Dose        Dose/MaxDose[%]
 layer 1: 	0.8	5.17382 GeV	1.39081	6.47608e-07 Gy	17.3315
 layer 2: 	1.6	5.24175 GeV	1.40907	6.5611e-07 Gy	17.5591
 layer 3: 	2.4	5.29862 GeV	1.42436	6.63229e-07 Gy	17.7496
 layer 4: 	3.2	5.41481 GeV	1.45559	6.77772e-07 Gy	18.1388
 layer 5: 	4	5.43787 GeV	1.46179	6.80658e-07 Gy	18.216
 layer 6: 	4.8	5.52101 GeV	1.48414	6.91065e-07 Gy	18.4946
 layer 7: 	5.6	5.64633 GeV	1.51783	7.06751e-07 Gy	18.9144
 layer 8: 	6.4	5.63969 GeV	1.51605	7.0592e-07 Gy	18.8921
 layer 9: 	7.2	5.71744 GeV	1.53695	7.15652e-07 Gy	19.1526
 layer 10: 	8	5.78086 GeV	1.55399	7.2359e-07 Gy	19.365
 layer 11: 	8.8	5.94371 GeV	1.59777	7.43975e-07 Gy	19.9106
 layer 12: 	9.6	6.02518 GeV	1.61967	7.54172e-07 Gy	20.1835
 layer 13: 	10.4	6.10292 GeV	1.64057	7.63903e-07 Gy	20.4439
 layer 14: 	11.2	6.18071 GeV	1.66148	7.7364e-07 Gy	20.7045
 layer 15: 	12	6.2621 GeV	1.68336	7.83827e-07 Gy	20.9771
 layer 16: 	12.8	6.37762 GeV	1.71441	7.98286e-07 Gy	21.3641
 layer 17: 	13.6	6.52458 GeV	1.75392	8.16682e-07 Gy	21.8564
 layer 18: 	14.4	6.67805 GeV	1.79517	8.35892e-07 Gy	22.3705
 layer 19: 	15.2	6.86252 GeV	1.84476	8.58982e-07 Gy	22.9884
 layer 20: 	16	6.95226 GeV	1.86889	8.70215e-07 Gy	23.289
 layer 21: 	16.8	7.11679 GeV	1.91312	8.90809e-07 Gy	23.8402
 layer 22: 	17.6	7.15125 GeV	1.92238	8.95122e-07 Gy	23.9556
 layer 23: 	18.4	7.43274 GeV	1.99805	9.30356e-07 Gy	24.8986
 layer 24: 	19.2	7.58811 GeV	2.03981	9.49804e-07 Gy	25.419
 layer 25: 	20	7.8156 GeV	2.10097	9.78279e-07 Gy	26.1811
 layer 26: 	20.8	7.94754 GeV	2.13643	9.94794e-07 Gy	26.6231
 layer 27: 	21.6	8.35363 GeV	2.2456	1.04562e-06 Gy	27.9834
 layer 28: 	22.4	8.44564 GeV	2.27033	1.05714e-06 Gy	28.2917
 layer 29: 	23.2	8.74817 GeV	2.35166	1.09501e-06 Gy	29.3051
 layer 30: 	24	9.08194 GeV	2.44138	1.13679e-06 Gy	30.4232
 layer 31: 	24.8	9.50886 GeV	2.55615	1.19022e-06 Gy	31.8533
 layer 32: 	25.6	9.93302 GeV	2.67017	1.24332e-06 Gy	33.2741
 layer 33: 	26.4	10.5627 GeV	2.83943	1.32213e-06 Gy	35.3834
 layer 34: 	27.2	11.1563 GeV	2.99902	1.39644e-06 Gy	37.3721
 layer 35: 	28	12.0025 GeV	3.22647	1.50235e-06 Gy	40.2065
 layer 36: 	28.8	13.1124 GeV	3.52485	1.64128e-06 Gy	43.9247
 layer 37: 	29.6	14.5158 GeV	3.90209	1.81694e-06 Gy	48.6257
 layer 38: 	30.4	16.8932 GeV	4.54119	2.11452e-06 Gy	56.5898
 layer 39: 	31.2	20.9827 GeV	5.64051	2.62641e-06 Gy	70.289
 layer 40: 	32	29.8521 GeV	8.02475	3.73658e-06 Gy	100
 layer 41: 	32.8	14.922 GeV	4.0113	1.86779e-06 Gy	49.9866
 layer 42: 	33.6	330.005 MeV	0.088711     4.13067e-08 Gy  1.10547
 layer 43: 	34.4	2.92265 MeV	0.000785658  3.65828e-10 Gy  0.00979044
 layer 44: 	35.2	864.413 keV	0.000232369  1.08199e-10 Gy  0.00289566
 layer 45: 	36	673.958 keV	0.000181172  8.43594e-11 Gy  0.00225766
 layer 46: 	36.8	1.18851 MeV	0.000319491  1.48765e-10 Gy  0.00398132
 layer 47: 	37.6	3.81319 MeV	0.00102505   4.77297e-10 Gy  0.0127736
 layer 48: 	38.4	4.58219 MeV	0.00123177   5.73552e-10 Gy  0.0153496
 layer 49: 	39.2	7.29449 MeV	0.00196088   9.13052e-10 Gy  0.0244355
 layer 50: 	40	0 eV 	0	0 Gy	0


 The run consists of 6000 proton of 62 MeV through 4 cm  of Water (density: 1 g/cm3 )
 divided into 50 slices.

 Edep is the deposited energy in every slice.
 Total incident energy(Ebeam)= 372 GeV
 Total energy deposit= 367.368 GeV
 Dose is the deposited dose in every slice.
 MaxDose is the highest dose value from all slices.
PlotDose.txt
The corresponding PlotDose.txt is:
0.8	17.3315
1.6	17.5591
2.4	17.7496
3.2	18.1388
4	18.216
4.8	18.4946
5.6	18.9144
6.4	18.8921
7.2	19.1526
8	19.365
8.8	19.9106
9.6	20.1835
10.4	20.4439
11.2	20.7045
12	20.9771
12.8	21.3641
13.6	21.8564
14.4	22.3705
15.2	22.9884
16	23.289
16.8	23.8402
17.6	23.9556
18.4	24.8986
19.2	25.419
20	26.1811
20.8	26.6231
21.6	27.9834
22.4	28.2917
23.2	29.3051
24	30.4232
24.8	31.8533
25.6	33.2741
26.4	35.3834
27.2	37.3721
28	40.2065
28.8	43.9247
29.6	48.6257
30.4	56.5898
31.2	70.289
32	100
32.8	49.9866
33.6	1.10547
34.4	0.00979044
35.2	0.00289566
36	0.00225766
36.8	0.00398132
37.6	0.0127736
38.4	0.0153496
39.2	0.0244355
40	0
The files DoseLongitudinalMesh.txt and EnergyLongitudinalMesh.txt contain information about the dose and energy deposition in 50 voxels along the beam.
DoseLongitudinalMesh.txt
# mesh name: waterMeshlongitudinal
# primitive scorer name: doseDeposit
# iX, iY, iZ, value [Gy]
0,0,0,6.398582855930675e-07
1,0,0,6.476076943270951e-07
2,0,0,6.561104727924428e-07
3,0,0,6.632288576514804e-07
4,0,0,6.777723406342788e-07
5,0,0,6.806579456409969e-07
6,0,0,6.91064665975597e-07
7,0,0,7.067512545709638e-07
8,0,0,7.059200031350208e-07
9,0,0,7.156519176900015e-07
10,0,0,7.235903386590427e-07
11,0,0,7.439747389552145e-07
12,0,0,7.541720785591247e-07
13,0,0,7.639027568851979e-07
14,0,0,7.736399498415839e-07
15,0,0,7.838271332286684e-07
16,0,0,7.982864751716507e-07
17,0,0,8.166815318022948e-07
18,0,0,8.35891621887706e-07
19,0,0,8.589818300723569e-07
20,0,0,8.702146985960477e-07
21,0,0,8.908094582985716e-07
22,0,0,8.951224309882678e-07
23,0,0,9.303558877909548e-07
24,0,0,9.498037872001912e-07
25,0,0,9.782791267955695e-07
26,0,0,9.947936277972093e-07
27,0,0,1.045624447589806e-06
28,0,0,1.057141333117292e-06
29,0,0,1.095009220830727e-06
30,0,0,1.136786796980433e-06
31,0,0,1.190224735866411e-06
32,0,0,1.243315989674068e-06
33,0,0,1.322130956487186e-06
34,0,0,1.396440433021823e-06
35,0,0,1.50234984419867e-06
36,0,0,1.641284907129354e-06
37,0,0,1.816941697430821e-06
38,0,0,2.11452442916524e-06
39,0,0,2.62640665908421e-06
40,0,0,3.736584034770657e-06
41,0,0,1.867790510876118e-06
42,0,0,4.130671695136958e-08
43,0,0,3.658280235043075e-10
44,0,0,1.081986690905131e-10
45,0,0,8.435936307778899e-11
46,0,0,1.48765431607862e-10
47,0,0,4.77297093105983e-10
48,0,0,5.735524713083603e-10
49,0,0,9.130516230902128e-10
EnergyLongitudinalMesh.txt
# mesh name: waterMeshlongitudinal
# primitive scorer name: energyDeposit
# iX, iY, iZ, value [MeV]
0,0,0,5111.912527768401
1,0,0,5173.82357976574
2,0,0,5241.753402253778
3,0,0,5298.623120998874
4,0,0,5414.812931353903
5,0,0,5437.86641165753
6,0,0,5521.007077722527
7,0,0,5646.32931010448
8,0,0,5639.688332367972
9,0,0,5717.437885750247
10,0,0,5780.858981508537
11,0,0,5943.712653315673
12,0,0,6025.180549012026
13,0,0,6102.920225997912
14,0,0,6180.711949227533
15,0,0,6262.098705563481
16,0,0,6377.616302015511
17,0,0,6524.576843992425
18,0,0,6678.048796107832
19,0,0,6862.519525245148
20,0,0,6952.260398532138
21,0,0,7116.794659477272
22,0,0,7151.251569109977
23,0,0,7432.736318595246
24,0,0,7588.108160872322
25,0,0,7815.601417563028
26,0,0,7947.537951731407
27,0,0,8353.632098427806
28,0,0,8445.642021147274
29,0,0,8748.173587841
30,0,0,9081.94017289281
31,0,0,9508.862939073984
32,0,0,9933.015992281295
33,0,0,10562.67919317931
34,0,0,11156.34743594843
35,0,0,12002.47173877234
36,0,0,13112.44234434682
37,0,0,14515.7876899454
38,0,0,16893.21551834444
39,0,0,20982.71039991735
40,0,0,29852.0643843804
41,0,0,14922.02559031455
42,0,0,330.0048285988424
43,0,0,2.922648496498087
44,0,0,0.8644134872755548
45,0,0,0.6739581164479411
46,0,0,1.188506721969284
47,0,0,3.813189646289314
48,0,0,4.582186601985135
49,0,0,7.294490257710744
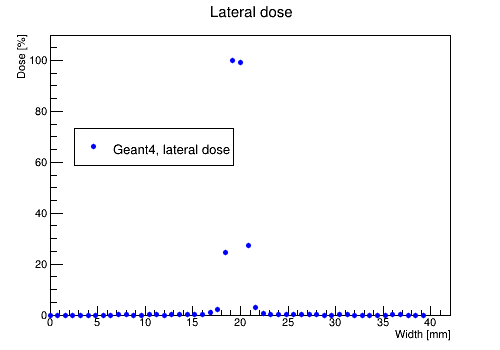
The files DoseLateralMesh.txt and EnergyLateralMesh.txt contain information about the dose and energy deposition in 50 voxels in direction perpendicular to the beam at its peak location along the beam.
DoseLateralMesh.txt
# mesh name: waterMeshlateral
# primitive scorer name: doseDeposit
# iX, iY, iZ, value [Gy]
0,0,0,0
0,0,1,0
0,0,2,0
0,0,3,0
0,0,4,0
0,0,5,0
0,0,6,0
0,0,7,0
0,0,8,0
0,0,9,8.892767522638671e-11
0,0,10,8.21852079266635e-10
0,0,11,0
0,0,12,0
0,0,13,8.318919310499272e-09
0,0,14,1.595723831016101e-09
0,0,15,0
0,0,16,2.546870274558055e-08
0,0,17,5.784197150675933e-08
0,0,18,1.230136624294735e-07
0,0,19,1.494748043820479e-07
0,0,20,2.215227319180893e-07
0,0,21,5.986605482048514e-07
0,0,22,1.329975409856811e-06
0,0,23,1.476881959416276e-05
0,0,24,5.974330866809595e-05
0,0,25,5.920917640298571e-05
0,0,26,1.639379722918268e-05
0,0,27,1.739367160863735e-06
0,0,28,3.982482450957319e-07
0,0,29,2.221785043134072e-07
0,0,30,1.39961928308002e-07
0,0,31,1.233101954534728e-07
0,0,32,5.621640994750944e-08
0,0,33,7.942616647408834e-08
0,0,34,4.494378494527077e-09
0,0,35,5.106873601769217e-08
0,0,36,0
0,0,37,0
0,0,38,3.322392221862852e-09
0,0,39,5.270936869417144e-10
0,0,40,0
0,0,41,0
0,0,42,0
0,0,43,0
0,0,44,0
0,0,45,2.717977576808592e-10
0,0,46,1.562629353086799e-10
0,0,47,0
0,0,48,0
0,0,49,0
EnergyLateralMesh.txt
# mesh name: waterMeshlateral
# primitive scorer name: energyDeposit
# iX, iY, iZ, value [MeV]
0,0,0,0
0,0,1,0
0,0,2,0
0,0,3,0
0,0,4,0
0,0,5,0
0,0,6,0
0,0,7,0
0,0,8,0
0,0,9,0.03552274834057498
0,0,10,0.3282942515999153
0,0,11,0
0,0,12,0
0,0,13,3.323047368326242
0,0,14,0.6374224438673245
0,0,15,0
0,0,16,10.17364184871573
0,0,17,23.10535828274578
0,0,18,49.13862148999507
0,0,19,59.7086997473273
0,0,20,88.48872117268637
0,0,21,239.1389175661426
0,0,22,531.2674784674697
0,0,23,5899.502718307062
0,0,24,23864.85999378014
0,0,25,23651.49732590654
0,0,26,6548.610787768303
0,0,27,694.8017225225892
0,0,28,159.0828968776824
0,0,29,88.75067379551463
0,0,30,55.90871844889415
0,0,31,49.25707356871391
0,0,32,22.45601696088681
0,0,33,31.72730779403615
0,0,34,1.795309230809683
0,0,35,20.39974454532298
0,0,36,0
0,0,37,0
0,0,38,1.327151558673589
0,0,39,0.2105510612469108
0,0,40,0
0,0,41,0
0,0,42,0
0,0,43,0
0,0,44,0
0,0,45,0.10857141290437
0,0,46,0.06242026356585469
0,0,47,0
0,0,48,0
0,0,49,0
Root file
Open Proton.root file in the following way:
[username@plus1 ProtonPB_build]$ root -l Proton.root

root [1] new TBrowser

Select ROOT Files and Proton.root
The energy deposition along the beam in the absorber
The energy deposition along the beam zoomed around the peak
You can close your ROOT session by typing
.q
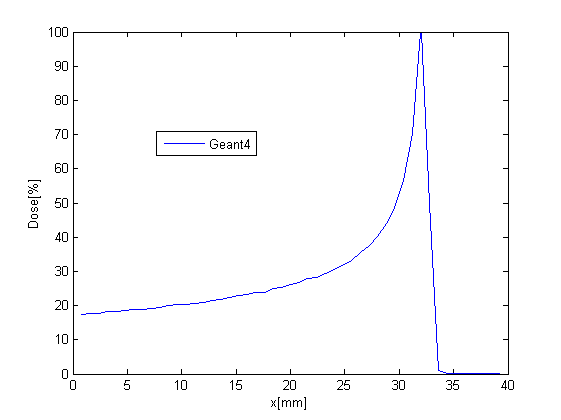
Plotting the dose distribution
Folder RootScripts contains several ROOT scripts which plot dose deposition in data and simulation.
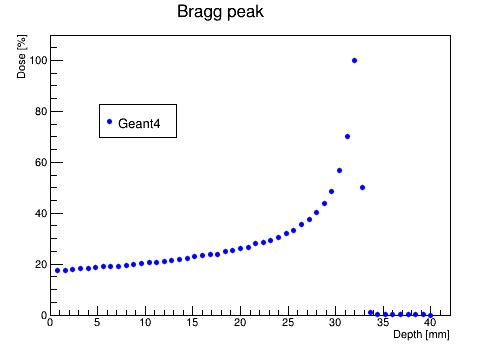
You can use script PlotSimulation.C to plot the dose deposition along the absorber.
This script uses PlotDose.txt.
Copy the script to your current ProtonPB_build directory:
cp /home/username/ProtonPBFolder/ProtonPB_source/RootScripts/PlotSimulation.C .
Then run the script in the following way:
[username@plus1 ProtonPB_build]$ root -l

root [1] .x PlotSimulation.C
This will create Simulation.root file with the following plot:
You can also plot the file PlotDose.txt using MATLAB.
Similarly to the previous example first copy the text file to your computer.
In the terminal at your computer write:
scp username@plus1.hep.ucl.ac.uk:/home/username/ProtonPBFolder/ProtonPB_build/PlotDose.txt .
Then, open MATLAB and follow the procedure:
- Import the file: Chose 'HOME' tab and 'Import Data'.
- In the 'Import Data' window select the 'PlotDose.txt' file choosing the right path.
- In the opened window select the data points in the 'IMPORT' tab. If you like, you can change the name of the variables. For example, 'x' instead of 'VarName1' and 'Dose' instead of 'VarName2'. Then, press 'Import Selection'/'Import Data'.
- Close the Import Window and in the Command Window type plot(x,Dose). Press Enter.
This plot will be created with added axis labels and a legend:
You can also plot the data in DoseLongitudinalMesh.txt and DoseLateralMesh.txt which were created using commands /score/ in the macro proton.mac.
The file DoseLongitudinalMesh.txt will be used later to compare with data from the Clatterbridge Cancer Center.
Now, use script PlotLateralDoseMesh.C to plot the lateral dose distribution.
Before running the script substitude the commas in DoseLateralMesh.txt with spaces.
Remove also the header in the text file.
Then, save the text file as DoseLateralMesh_Mod.txt.
[username@plus1 ProtonPB_build]$ cp /home/username/ProtonPBFolder/ProtonPB_source/RootScripts/PlotLateralDoseMesh.C .

[username@plus1 ProtonPB_build]$ root -l

root [1] .x PlotLateralDoseMesh.C
This will create LateralDose_Mesh.root file with the following plot:
Run with different settings
You can change the physics process, incident proton energy and number of slices etc. by
modifying the macro proton.mac.
Open the macro with editor pico:
[username@plus1 ProtonPB_build]$ pico proton.mac
This is the content of the macro:
# proton.mac
#
/control/verbose 2
/run/verbose 2
/tracking/verbose 0
/run/particle/verbose 1
/run/particle/dumpList
#
# set geometry
/protonPB/det/setSizeX  4 cm
/protonPB/det/setSizeYZ 4 cm
/protonPB/det/setSliceSizeYZ 4 cm
/protonPB/det/sliceNumber 50
#
# define longitudinal scoring mesh
# along the beam
/score/create/boxMesh waterMeshlongitudinal
/score/mesh/boxSize 2. 2. 2. cm
/score/mesh/nBin 50 1 1
/score/mesh/translate/xyz 0. 0. 0. cm
/score/quantity/energyDeposit energyDeposit
/score/quantity/doseDeposit doseDeposit
/score/close
#
# define lateral scoring mesh
# centered at the Bragg peak
/score/create/boxMesh waterMeshlateral
/score/mesh/boxSize 0.1 2. 2. cm
/score/mesh/nBin 1 1 50
/score/mesh/translate/xyz 1.2 0. 0. cm
/score/quantity/energyDeposit energyDeposit
/score/quantity/doseDeposit doseDeposit
/score/close
#
# set physics process
/protonPB/phys/addPhysics QGSP_BIC_EMY
#/protonPB/phys/addPhysics emlivermore
#/protonPB/phys/addPhysics empenelope
#
# production tresholds (recommended range
#cut off not bigger than 10% of slice thickness)
/protonPB/phys/setCuts 0.2 mm
#/protonPB/phys/setGCut 1 um
#/protonPB/phys/setECut 1 um
#/protonPB/phys/setPCut 1 um
#
# initialize
/run/initialize
#
# visualisation
#/control/execute visualisation.mac
#
/gun/particle proton
# particle energy used in Clatterbridge Centre
/gun/energy 62 MeV
#
# beam size
#/photonPB/gun/rndm 3 mm
#
# step limit (recommended not bigger than 5% of
# slice thickness)
/protonPB/stepMax 0.1 mm
#
/protonPB/event/printModulo 50
#
# output file
/analysis/setFileName Proton
#
# histogram
/analysis/h1/set 2 50 25 35 mm
# number of events
/run/beamOn 6000
#
# drawing projections
#/score/drawProjection waterMeshlongitudinal doseDeposit
#/score/drawProjection waterMeshlateral doseDeposit
#
# dump scores to a file
/score/dumpQuantityToFile waterMeshlongitudinal doseDeposit DoseLongitudinalMesh.txt
/score/dumpQuantityToFile waterMeshlongitudinal energyDeposit EnergyLongitudinalMesh.txt
/score/dumpQuantityToFile waterMeshlateral doseDeposit DoseLateralMesh.txt
/score/dumpQuantityToFile waterMeshlateral energyDeposit EnergyLateralMesh.txt
Change dimensions of the water box
The default size is 4x4x4 cm. You can change the dimensions by modifying the lines
/protonPB/det/setSizeX  4 cm
/protonPB/det/setSizeYZ 4 cm
Change the physics process
The default physics process is QGSP_BIC_EMY.
This is a physics list recommended for proton therapy.
You can check what will be the dose deposition if you change the physics list.
In proton.mac change
/photonPB/phys/addPhysics QGSP_BIC_EMY
to
/photonPB/phys/addPhysics emlivermore
Change the incident proton energy
The default energy is 62 MeV.
This is one of the energies used in radiotherapy.
In proton.mac you can change the value of 62 MeV
/gun/energy 62 MeV
to, for example, 50 MeV
/gun/energy 50 MeV
Change the diameter of the beam
You can set the diameter of the beam with the command:
/protonPB/gun/rndm 3 mm
Change the number of slices
You can change the number of slices.
The default number is 50.
Keep in mind that if you want to increase the number of slices you need to modify the file DetectorConstruction.hh in /ProtonPB_source/include/.
In DetectorConstruction.hh set MaxLayer to value bigger than the number of your slices.
The default value is MaxLayer=60.
For example, if you want to have 55 slices you do not need to modify MaxLayer.
Then, only in proton.mac change the number of slices:
/protonPB/det/sliceNumber 55
Modify the mesh
You can change the size of the mesh (longitudinal and lateral) and the number of voxels by modifying their corresponding lines
/score/mesh/boxSize 2. 2. 2. cm
/score/mesh/nBin 30 1 1
After modifications in proton.mac
After modifying the macro proton.mac you can run it:
[username@plus1 ProtonPB_build]$ ./protonPB proton.mac
If you modify files in directory ProtonPB_source (for example you change the value of MaxLayer) you need to compile the code. In directory PhotonPB_build do:
[username@plus1 ProtonPB_build]$ make
then run the macro proton.mac.
Visualisation
If you want to use visualisation, in macro proton.mac uncomment the line /control/execute visualisation.mac.
This will run macro visualisation.mac with a specific visualisation setup.
If you uncomment the lines /score/drawProjection waterMeshlongitudinal doseDeposit and /score/drawProjection waterMeshlateral doseDeposit you will draw the dose projections.
In this example, we use DAWN event display.
Before running the visualisation look at this DAWN tutorial.
To run the visualisation, first uncomment lines /control/execute visualisation.mac and /score/drawProjection waterMeshlongitudinal doseDeposit.
Then, run the proton.mac:
[username@plus1 ProtonPB_build]$ ./protonPB proton.mac
In addition to the text files the code will create two .prim files, g4_00.prim and g4_01.prim.
The first file contains detector geometry and particle interactions.
The second file contains dose projections.
While running the proton.mac you will be asked to open g4_00.prim in DAWN.
In the opened window press OK.
This will create your first visualisation:
The second file g4_01.prim will not open automatically. It will be created after the running is finished. Open the file in the following way:
[username@plus1 ProtonPB_build]$ dawn g4_01.prim
In the opened window press OK and this will create the image:
You can modify the .prim files in DAWN. For example, in the DAWN display change the polar and azimuthal angles. 1) (polar angle, azimuthal angle) = (0,90) will create this image:
2) (polar angle, azimuthal angle) = (90,0) will create this image:
Now, in proton.mac macro uncomment /score/drawProjection waterMeshlateral doseDeposit and comment /score/drawProjection waterMeshlongitudinal doseDeposit.
Run proton.mac with the new settings.
The image with the lateral dose projections will look like that:
Data from The Clatterbridge Cancer Centre
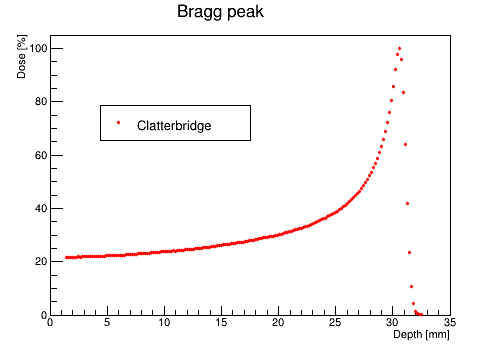
The file ClatterbridgeBraggPeak.txt contains Bragg Peak data from the Clatterbridge Cancer Center.
The first column represents the values in mm in depth, the second column represents the normalized values of deposited dose and normalized at the peak.
You can use script PlotData.C from folder RootScripts to plot the data: these are available in the directory http://www.hep.ucl.ac.uk/pbt/wikiData/code/ProtonPB/.
Copy files ClatterbridgeData.txt and PlotData.C to your current ProtonPB_build directory and run the script:
[username@plus1 ProtonPB_build]$ cp /home/username/ProtonPBFolder/ProtonPB_source/RootScripts/PlotData.C .

[username@plus1 ProtonPB_build]$ cp /home/username/ProtonPBFolder/ProtonPB_source/RootScripts/ClatterbridgeData.txt .

[username@plus1 ProtonPB_build]$ root -l

root [1] .x PlotData.C
This will create ClatterbridgeData.root file with the following plot:
Comparison between data and simulation
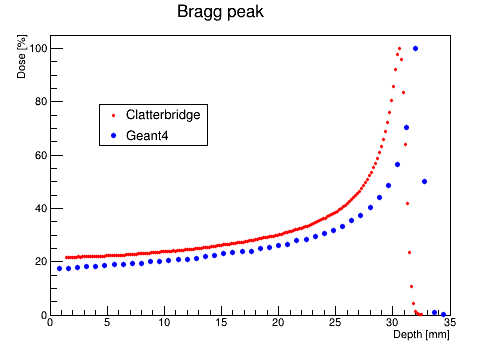
The scripts PlotDataAndSim.C and PlotDataAndSimMesh.C in folder RootScripts compare data with simulation.
You can use script PlotDataAndSim.C to compare data (ClatterbridgeData.txt) and simulation (PlotDose.txt).
Both text files must be in the folder where you run the script.
[username@plus1 ProtonPB_build]$ cp /home/username/ProtonPBFolder/ProtonPB_source/RootScripts/PlotDataAndSim.C .

[username@plus1 ProtonPB_build]$ root -l

root [1] .x PlotDataAndSim.C
This will create BraggPeakComparison.root file with the following plot:
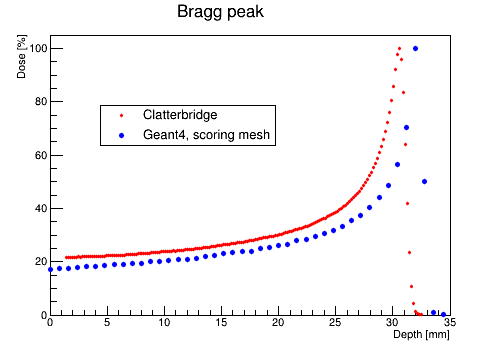
You can also compare data (ClatterbridgeData.txt) with simulation done with scoring mesh (DoseLongitudinalMesh.txt).
This can be done with script PlotDataAndSimMesh.C.
This script works only if before running it you substitute the commas in DoseLongitudinalMesh.txt with spaces.
Remove also the header in the text file.
Save the new text file as DoseLongitudinalMesh_Mod.txt.
[username@plus1 ProtonPB_build]$ cp /home/username/ProtonPBFolder/ProtonPB_source/RootScripts/PlotDataAndSimMesh.C .

[username@plus1 ProtonPB_build]$ root -l

root [1] .x PlotDataAndSimMesh.C
This creates BraggPeakComparison_Mesh.root file with the following plot:
Files
List of files for Mononenergetic Proton Pencil Beam simulation.
