Software/Geant4/Tutorials/Basic/Monoenergetic Photon Pencil Beam: Difference between revisions
SimonJolly (talk | contribs) No edit summary |
SimonJolly (talk | contribs) No edit summary |
||
| (4 intermediate revisions by the same user not shown) | |||
| Line 1: | Line 1: | ||
== | == Monoenergetic Photon Pencil Beam == | ||
This example shows the dose distribution in water along the incident photon beam. The beam hits the water cube surface and deposits a dose under the surface of the water. | This example shows the dose distribution in water along the incident photon beam. The beam hits the water cube surface and deposits a dose under the surface of the water. | ||
| Line 14: | Line 14: | ||
Photons are in green, electrons are in red. | Photons are in green, electrons are in red. | ||
== | == Running the Tutorial == | ||
All the source files for the tutorial can be found in http://www.hep.ucl.ac.uk/pbt/wikiData/code/PhotonPB/. | |||
=== Connect to the HEP cluster and create folder PhotonPBFolder in your area === | === Connect to the HEP cluster and create folder PhotonPBFolder in your area === | ||
| Line 31: | Line 33: | ||
<pre> | <pre> | ||
[username@plus1 PhotonPBFolder]$ source /unix/pbt/software/ | [username@plus1 PhotonPBFolder]$ source /unix/pbt/software/scripts/pbt.sh | ||
</pre> | </pre> | ||
Latest revision as of 17:48, 5 October 2016
Monoenergetic Photon Pencil Beam
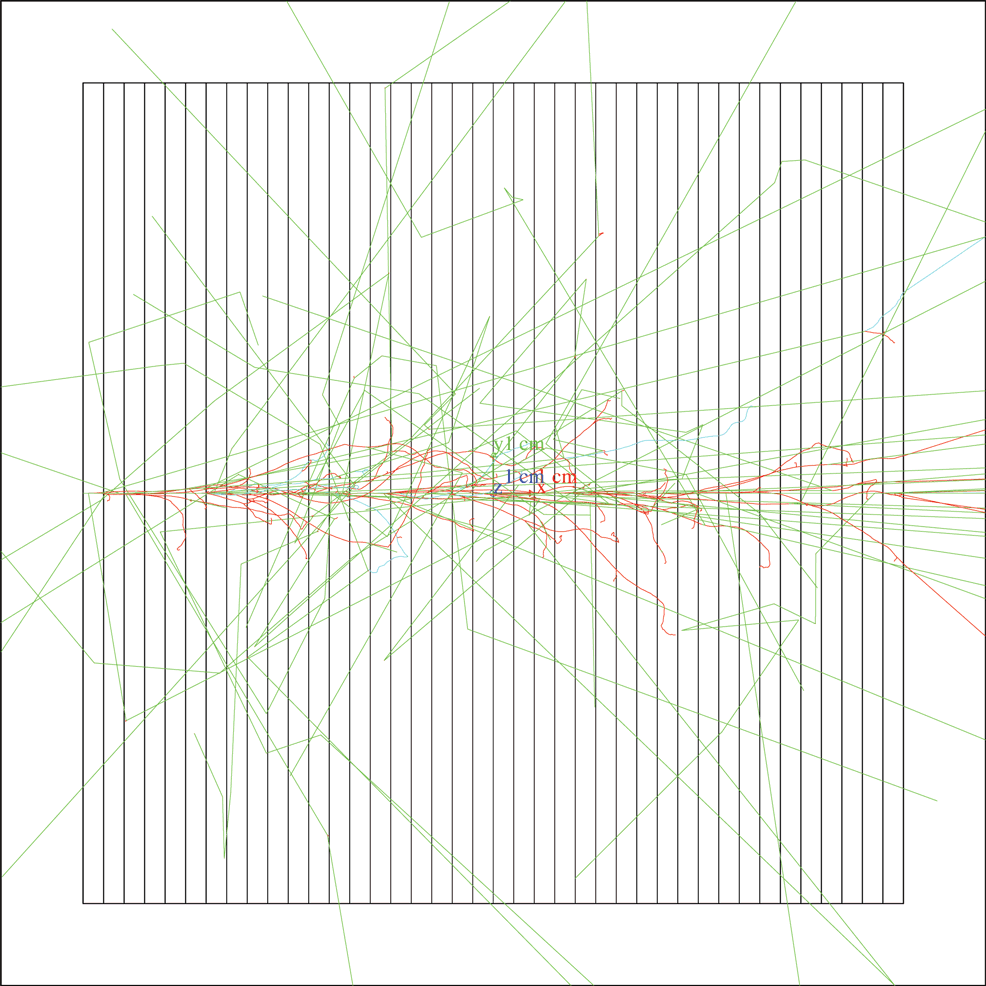
This example shows the dose distribution in water along the incident photon beam. The beam hits the water cube surface and deposits a dose under the surface of the water. The volume of the water cube is divided into slices perpendicular to the incident beam. At each slice the deposited dose and energy is computed.
The slices are created using class G4PVReplica. The energy and dose are scored using classes G4UserSteppingAction and G4UserRunAction.
Photons are generated using G4ParticleGun class.
There is an option to chose among several EM physics lists.
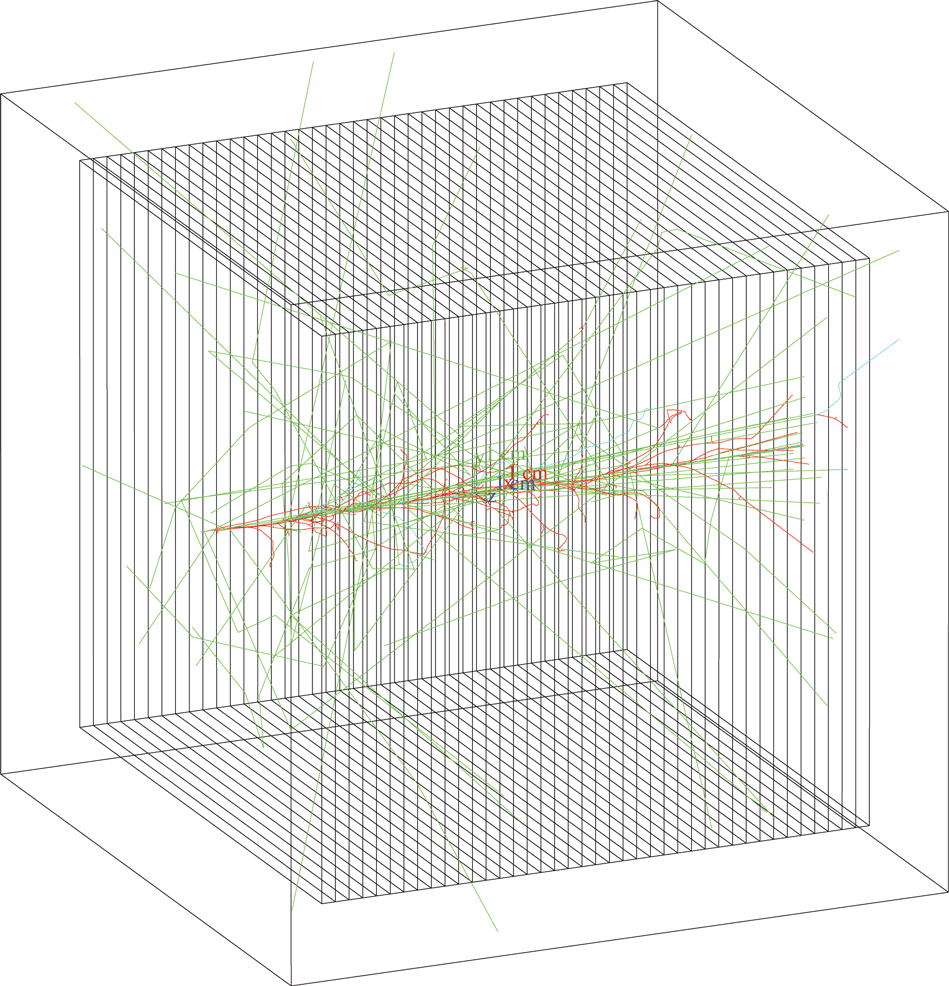
The image shows the water box divided into slices using class G4PVReplica.
Photons are in green, electrons are in red.
Running the Tutorial
All the source files for the tutorial can be found in http://www.hep.ucl.ac.uk/pbt/wikiData/code/PhotonPB/.
Connect to the HEP cluster and create folder PhotonPBFolder in your area
ssh -X username@plus1.hep.ucl.ac.uk

username@plus1.hep.ucl.ac.uk's password: type your password here

[username@plus1 ~]$ mkdir PhotonPBFolder

[username@plus1 ~]$ cd PhotonPBFolder
Setup your environment
[username@plus1 PhotonPBFolder]$ source /unix/pbt/software/scripts/pbt.sh
Copy the code to your working directory and rename it
[username@plus1 PhotonPBFolder]$ cp -r /unix/pbt/tutorials/basic/PhotonPB .

[username@plus1 PhotonPBFolder]$ mv PhotonPB PhotonPB_source
Inside /home/username/PhotonPBFolder/ create a directory
[username@plus1 PhotonPBFolder]$ mkdir PhotonPB_build
Compile the code with cmake and make
[username@plus1 PhotonPBFolder]$ cd PhotonPB_build

[username@plus1 PhotonPB_build]$ cmake -DGeant4_DIR=/unix/pbt/software/dev /home/username/PhotonPBFolder/PhotonPB_source

[username@plus1 PhotonPB_build]$ make
Run macro gamma.mac
[username@plus1 PhotonPB_build]$ ./photonPB gamma.mac
Analysing the Data
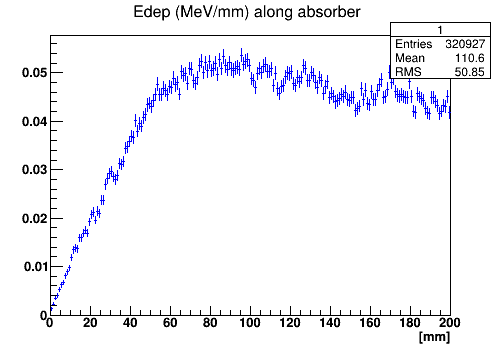
The macro produces root file Gamma.root with a histogram showing the energy deposition in water box along the beam line.
It also produces text files: DoseFile.txt with energy and dose deposited in each slice and PlotDose.txt with dose deposited in each slice.
Text files
This is output from DoseFile.txt with physics process emstandard_opt0 and incident photon energy of 20 MeV.
Use your favorite editor pico, vi, emacs etc. to open text files.
For example, use editor pico:
[username@plus1 PhotonPB_build]$ pico DoseFile.txt
 Layers :	 x[mm] 	Edep   	     Edep/Ebeam[%] 	Dose 	       Dose/MaxDose[%]
 layer 1: 	5	119.065 MeV	0.0992211	9.53818e-11 Gy	15.1483
 layer 2: 	10	206.505 MeV	0.172088	1.65429e-10 Gy	26.2731
 layer 3: 	15	259.584 MeV	0.21632	        2.07949e-10 Gy	33.026
 layer 4: 	20	311.898 MeV	0.259915	2.49858e-10 Gy	39.6819
 layer 5: 	25	395.255 MeV	0.329379	3.16634e-10 Gy	50.2871
 layer 6: 	30	439.052 MeV	0.365876	3.51719e-10 Gy	55.8592
 layer 7: 	35	503.311 MeV	0.419426	4.03197e-10 Gy	64.0348
 layer 8: 	40	573.742 MeV	0.478118	4.59618e-10 Gy	72.9954
 layer 9: 	45	624.707 MeV	0.520589	5.00446e-10 Gy	79.4796
 layer 10: 	50	678.383 MeV	0.565319	5.43445e-10 Gy	86.3086
 layer 11: 	55	694.602 MeV	0.578835	5.56437e-10 Gy	88.3721
 layer 12: 	60	710.771 MeV	0.592309	5.6939e-10 Gy	90.4292
 layer 13: 	65	744.826 MeV	0.620689	5.96672e-10 Gy	94.762
 layer 14: 	70	742.436 MeV	0.618697	5.94757e-10 Gy	94.4579
 layer 15: 	75	771.713 MeV	0.643094	6.1821e-10 Gy	98.1827
 layer 16: 	80	767.22 MeV	0.63935	        6.14611e-10 Gy	97.611
 layer 17: 	85	775.608 MeV	0.64634	        6.21331e-10 Gy	98.6783
 layer 18: 	90	762.779 MeV	0.635649	6.11053e-10 Gy	97.046
 layer 19: 	95	785.997 MeV	0.654997	6.29653e-10 Gy	100
 layer 20: 	100	735.186 MeV	0.612655	5.88949e-10 Gy	93.5355
 layer 21: 	105	761.414 MeV	0.634512	6.0996e-10 Gy	96.8724
 layer 22: 	110	721.836 MeV	0.60153	        5.78254e-10 Gy	91.837
 layer 23: 	115	730.726 MeV	0.608939	5.85376e-10 Gy	92.9681
 layer 24: 	120	728.394 MeV	0.606995	5.83508e-10 Gy	92.6714
 layer 25: 	125	744.904 MeV	0.620753	5.96734e-10 Gy	94.7719
 layer 26: 	130	731.53 MeV	0.609608	5.8602e-10 Gy	93.0703
 layer 27: 	135	702.85 MeV	0.585709	5.63045e-10 Gy	89.4215
 layer 28: 	140	671.716 MeV	0.559763	5.38104e-10 Gy	85.4604
 layer 29: 	145	676.297 MeV	0.56358	        5.41773e-10 Gy	86.0432
 layer 30: 	150	653.849 MeV	0.544875	5.23791e-10 Gy	83.1873
 layer 31: 	155	674.152 MeV	0.561793	5.40055e-10 Gy	85.7703
 layer 32: 	160	687.008 MeV	0.572507	5.50354e-10 Gy	87.406
 layer 33: 	165	706.2 MeV	0.5885	        5.65729e-10 Gy	89.8478
 layer 34: 	170	700.841 MeV	0.584034	5.61435e-10 Gy	89.1659
 layer 35: 	175	686.009 MeV	0.571674	5.49553e-10 Gy	87.2788
 layer 36: 	180	658.891 MeV	0.549076	5.2783e-10 Gy	83.8287
 layer 37: 	185	644.999 MeV	0.537499	5.16701e-10 Gy	82.0613
 layer 38: 	190	655.81 MeV	0.546508	5.25362e-10 Gy	83.4367
 layer 39: 	195	645.691 MeV	0.538075	5.17255e-10 Gy	82.1493
 layer 40: 	200	0 eV 	        0	        0 Gy	        0


 The run consists of 6000 gamma of 20 MeV through 20 cm  of Water (density: 1 g/cm3 )
 divided into 40 slices.

 Edep is the deposited energy in every slice.
 Total incident energy(Ebeam)= 120 GeV
 Total energy deposit= 24.8344 GeV
 Dose is the deposited dose in every slice.
 MaxDose is the highest dose value from all slices.
This is PlotDose.txt.
These values can be analyzed with MATLAB and ROOT.
5	15.1483
10	26.2731
15	33.026
20	39.6819
25	50.2871
30	55.8592
35	64.0348
40	72.9954
45	79.4796
50	86.3086
55	88.3721
60	90.4292
65	94.762
70	94.4579
75	98.1827
80	97.611
85	98.6783
90	97.046
95	100
100	93.5355
105	96.8724
110	91.837
115	92.9681
120	92.6714
125	94.7719
130	93.0703
135	89.4215
140	85.4604
145	86.0432
150	83.1873
155	85.7703
160	87.406
165	89.8478
170	89.1659
175	87.2788
180	83.8287
185	82.0613
190	83.4367
195	82.1493
200	0
Root file
Open Gamma.root file in the following way:
[username@plus1 PhotonPB_build]$ root -l Gamma.root

root [1] new TBrowser

Select ROOT files and Gamma.root
The histogram inside Gamma.root shows the energy deposition in water box:
To exit the ROOT terminal type
.q
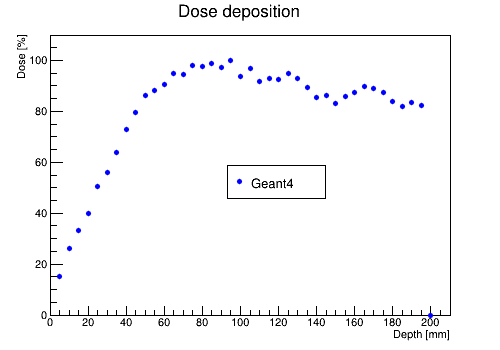
You can plot the dose deposition along the depth of the absorber (PlotDose.txt) using script PlotSimulation.C from folder PhotonPB_source.
Copy this script to your current PhotonPB_build directory:
[username@plus1 PhotonPB_build]$ cp /home/username/PhotonPBFolder/PhotonPB_source/PlotSimulation.C .
Then run the script:
[username@plus1 PhotonPB_build]$ root -l

root [1] .x PlotSimulation.C
This will create Simulation.root file.
Open the root file:
[username@plus1 PhotonPB_build]$ root -l Simulation.root

root [1] new TBrowser

Select ROOT files and Gamma.root
This is the result:
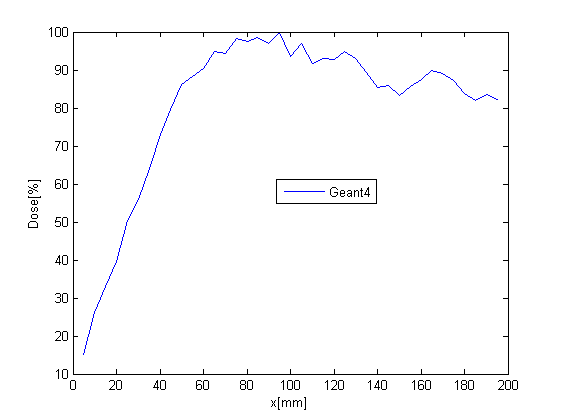
You can also plot the file PlotDose.txt using MATLAB.
This software is installed on the UCL HEP Linux cluster but using it via ssh is not recommended because it is slow.
If you have MATLAB installed on your computer you can import the PlotDose.txt file and plot it.
You can also use the MATLAB installed on the computers at the Science Library.
Before proceeding with MATLAB you need to copy the text files from the cluster to your computer.
In the terminal at your computer write:
scp username@plus1.hep.ucl.ac.uk:/home/username/PhotonPBFolder/PhotonPB_build/PlotDose.txt .
The file PlotDose.txt will be copied in your current directory. Then, open MATLAB and follow the procedure:
- Import the file: Chose 'HOME' tab and 'Import Data'.
- In the 'Import Data' window select the 'PlotDose.txt' file choosing the right path.
- In the opened window select the data points in the 'IMPORT' tab. If you like, you can change the name of the variables. For example, 'x' instead of 'VarName1' and 'Dose' instead of 'VarName2'. Then, press 'Import Selection'/'Import Data'.
- Close the Import Window and in the Command Window type plot(x,Dose). Press Enter.
This plot will be created with added axis labels and a legend:
Run with different settings
You can change the physics process, incident photon energy, phantom material, number of slices etc. by
modifying the macro gamma.mac. Open the macro with editor pico:
[username@plus1 PhotonPB_build]$ pico gamma.mac
This is the content of the macro:
# gamma.mac
#
/control/verbose 2
/run/verbose 2
/tracking/verbose 0
/run/particle/verbose 1
/run/particle/dumpList
#
# set geometry and material
/photonPB/det/setMat Water
#/photonPB/det/setMat Lead
/photonPB/det/setSizeX  20 cm
/photonPB/det/setSizeYZ 20 cm
/photonPB/det/setSliceSizeYZ 20 cm
/photonPB/det/sliceNumber 40
#
# set physics process
/photonPB/phys/addPhysics emstandard_opt0
#/photonPB/phys/addPhysics emlivermore
#/photonPB/phys/addPhysics empenelope
#
# production tresholds (range cut off-
# not bigger than 10% of slice thickness)
/photonPB/phys/setCuts 1 mm
#/photonPB/phys/setGCut 1 um
#/photonPB/phys/setECut 1 um
#/photonPB/phys/setPCut 1 um
#
# initialize
/run/initialize
#
# visualisation
#/control/execute visualisation.mac

# particle gun properties (type of
#particle and energy)
/gun/particle gamma
#/gun/particle e-
/gun/energy 20 MeV
#
# beam size
#/photonPB/gun/rndm 3 mm
#
# step limit (not bigger than 5% of
# slice thickness)
/photonPB/stepMax 0.5 mm
#
/photonPB/event/printModulo 50
#
# output root file
/analysis/setFileName Gamma
#
# number of events
/run/beamOn 6000
Change the physics process
The default physics process is emstandard_opt0.
This package is used in high energy experiments.
In gamma.mac change
/photonPB/phys/addPhysics emstandard_opt0
to
/photonPB/phys/addPhysics emlivermore
The process emlivermore is used in low energy physics experiments.
Change the incident particle energy
The default energy is 20 MeV. The typical therapeutic beam energy used in radiotherapy is in the interval 0.3 to 20 MeV.
In gamma.mac you can change the value of 20 MeV:
/gun/energy 20 MeV
to, for example, 1.25 MeV:
/gun/energy 1.25 MeV
This is the energy of the photon beams from cobalt-60 therapy machines.
Keep in mind that the primary particle generation is done at /PhotonPB_source/src/PrimaryGeneratorAction.cc.
This is part of the PrimaryGeneratorAction.cc:
fParticleGun  = new G4ParticleGun(1);
G4ParticleDefinition* particle = G4ParticleTable::GetParticleTable()->FindParticle("proton");
fParticleGun->SetParticleDefinition(particle);
fParticleGun->SetParticleEnergy(160*MeV);
fParticleGun->SetParticleMomentumDirection(G4ThreeVector(1.,0.,0.));

...

G4double x0 = -0.5*(fDetector->GetAbsorSizeX());
G4double y0 = 0.*cm, z0 = 0.*cm;

...

fParticleGun->SetParticlePosition(G4ThreeVector(x0,y0,z0));
The line
fParticleGun = new G4ParticleGun(1);
means that only one particle is generated, incident from (x0,y0,z0). The default number of events is set to 6000. Therefore, 6000 particles are incident to the water box.
Change the diameter of the beam
You can set the diameter of the beam with the command:
/photonPB/gun/rndm 3 mm
Change the material
In this example we compute the energy deposition of photons in water box. However, there is an option to change the box material from water to lead.
In gamma.mac change:
/photonPB/det/setMat Water
to:
/photonPB/det/setMat Lead
Change the type of incident particle
In gamma.mac change the photon
/gun/particle gamma
to electron
/gun/particle e-
Change the number of slices
You can change the number of slices.
The default number is 40.
Keep in mind that if you want to have bigger number of slices you need to modify the file DetectorConstruction.hh in /PhotonPB_source/include/.
In DetectorConstruction.hh set MaxLayer to a value which is bigger then the number of your slices.
The default number is MaxLayer=50.
For example, if you want your box to be divided to 60 slices you need to set the value of MaxLayer to, for example, 65 then in gamma.mac you need to change the number of slices:
/photonPB/det/sliceNumber 60
Every time you modify files in directory PhotonPB_source you need to compile your code.
In directory PhotonPB_build do:
make
then run the macro
[username@plus1 PhotonPB_build]$ ./photonPB gamma.mac
Visualisation
If you want to use visualisation, in macro gamma.mac uncomment the line /control/execute visualisation.mac.
This will run macro visualisation.mac with a specific visualisation setup.
In this example, we use DAWN event display.
Before running the visualisation look at the DAWN tutorial.
To run the visualisation, uncomment line /control/execute visualisation.mac and run the gamma.mac macro:
[username@plus1 PhotonPB_build]$ ./photonPB gamma.mac
In addition to the text files the code will create two .prim files, g4_00.prim and g4_01.prim. Both files contain detector geometry and particle interactions. While running the gamma.mac you will be asked to open g4_00.prim in DAWN. In the opened window press OK. This will create your first visualisation:
The second file g4_01.prim will not open automatically. It will be created after the running is finished. Open the file in the following way:
[username@plus1 PhotonPB_build]$ dawn g4_01.prim
In the DAWN display change the polar and azimuthal angles to 0 and 90 degrees, then press OK. This will create the image:
The color in the images indicates the type of the particle. Photons are in green, electrons are in red and positrons are in cyan.
Files
List of files for Mononenergetic Photon Pencil Beam simulation.
